Search the help documentation

Search:

Can't find what you are looking for? Use the Feedback tab in your app to submit an issue, or email support@ qrimp.com.


idnamedescriptionParentTopic
deleteedit56Calendar ViewAll tables with a date field (Date/Time [datatype]) will be viewable on a Calendar. When the Calendar view is available, the calendar icon <img align="absmiddle" src="/attachments/d8b7ffcf-fc7d-4ec9-ae46-a5428e455455/CalendarIcon.png">appears near the top of the page in the [Content Header]. A link to the calendar view also appears by default in sub-menu tabs.

The Calendar View opens for the current month. You can select other months and years from the drop-downs at the top of the page. You can also go to a day view.

<h2>Tables with CreateDate and Other Date Fields</h2>
If you choose the [Auditing] option when creating your table, your table will be given a "createdate" field, which means that when you click on the Calendar View icon, you will see a calendar of when items were created.

If there is more than one Date field in a table, the Calendar will show items with the FIRST date column by default. Once you are in the Calendar, you will be able to choose to show the calendar with items from another date field using a drop-down box.

<img class="border" src="attachments/developer.qrimp.com-d2a90262-4623-4a26-8112-8eb1194a17ae/choosedateforcalendarview.png" />

For example, if I have a Projects table with two date fields "Start Date" and "End Date", when I first open the table in Calendar view, I will see items that Start on days in the month I am in. If I want to see when items end, I can choose "End Date" from the "View By" drop-down box at the top left of the view.

<h2>Changing Due Dates with Drag and Drop</h2>
You can [drag and drop] an item on the Calendar and the selected date field will update the item to the new date.
Views
deleteedit232Notification ParametersAfter you have subscribed a user to a notification (See: [Notification Subscriptions] [Notifications and Custom Notifications]), you can set notifications to be sent only when certain parameters are met. For example, you can send a notification to your sales rep Evelyn only when the order type is wholesale.

To set up a filtered notification, go to Admin > Notification Subscriptions and select the notification to filter.
<img class="border" src="/attachments/developer.qrimp.com-65b33786-c4ea-4bff-b3c0-98456fe4b17b/notifications subscriptions menu.png" />

Click the link on the far right that says 'Set Parameters'.
<img class="border" src="/attachments/developer.qrimp.com-bb13bf70-368a-4459-afb4-bcea6282eed4/notification subscription to filter.png" />

Now you are on the Notification Parameters page. At the top, you will see the notification you are setting up.
<img class="border" src="/attachments/developer.qrimp.com-d7159eda-767e-4f6a-936d-8288e408f9d2/notification to filter.png" />

If any previous filters have been set, you will see them under "Current Parameters".
<img class="border" src="/attachments/developer.qrimp.com-80fd93fb-7661-492e-b3f3-4ec7c4f0ee73/notifications current parameters.png" />

Select your parameters, then click "Save".
<img class="border" src="/attachments/developer.qrimp.com-911170fe-430e-44fc-8a21-5e58d6b65720/notifications set parameters.png" />

From now on, when a new Wholesale Order comes in, Evelyn will get an email about it. The email will look like this:

<img class="border" src="/attachments/developer.qrimp.com-f67575af-e944-48fc-93f4-be61bc05b119/notification parameters email.PNG" />

Note: Evelyn will no longer get an email for <em>every</em> order, only New Orders that are Wholesale. If you would like her to also get an email for every order, you must create a new, separate notification subscription.

You can change what the email notification says and what it looks like with [Notification Templates].


Notification Subscriptions
deleteedit91Check POP3 Email AccountsAdd Qrimp's <a href="http://en.wikipedia.org/wiki/Pop3">POP3 Email</a> account checker to display your email addresses with a message count in brackets beside the name of the email address, like this:

name@mywebmail.com (7 new)
mynickname@mydomain.com (10 new)

You can set up each email address to link to the sign in page for the email provider. Depending on your provider, you may also be able to add automatic sign in when you click on the link.

You must be a site admin to add POP accounts.

Go to Admin > POP Email Accounts.

In the name field, enter the text for the link. You can use the email address name ie: "name@mywebmail.com" or something like "My Web Mail Account".

In the userid drop-down list box, select the user who will check the account.

Enter the POP Server ie: mail.myprovider.com. If you are unsure what your POP Server address is, check email provider's help files.

In the popusername field, enter the email address, ie: name@mywebmail.com

Enter the actual current password for the email account. If you are creating a POP Account for someone other than yourself, you will have to get them to do this. The password will always be displayed as stars (**********) to every user.

Enter the url of your email service (the page you visit to check your account). If your provider allows for automated sign in using a url, you can enter the specified url, and use square bracketed field names to populate the required user-specific information from the Qrimp POP Email Accounts table, as follows: [ popusername] [ poppassword]

Do not enter anything in the lastupdatedate field. It will update automatically.

Enter 0 in the messagecount field.

That's it.
Communicate and Share
deleteedit1324Above and beside your dataAbove your data, you generally find the Header and below, you find the footer, or 'rightcontent' or [item footer].Navigation
deleteedit261urlA url (uniform resource locator) is the string of words and symbols that makes an address on the internet.

<img class="border" src="attachments/developer.qrimp.com-69a2f894-65ef-4795-bcdc-064b54a403e9/url.png" />
<span class="small">A url</span>

If you type in www.qrimp.com into the [location bar] of your [web browser], you have just written a url.

Links on websites are also urls.

A url usually has two parts. A file path leads to a location on the internet, like a website, and [query strings] contain parameters that specify which data from a site or database to pull back into your browser for display. Query strings are used when a website communicates with a database - the information in the query string tells the database which data to pull in to the web browser.
Definitions
deleteedit1292Radio ButtonA radio button is an interface input to a [datatype] that has two options. It shows up as two small circles. When one option is selected, a dot appears in the selected circle.

<label class="datalabel move" for="Canceled">Canceled:</label>
<span class="radiobtn" style="white-space: nowrap;"><input name="Canceled" tabindex="8" id="CanceledN" type="radio" value="N"><label for="CanceledN">No </label></span><span class="radiobtn" style="white-space: nowrap;"><input name="Canceled" tabindex="7" id="CanceledY" type="radio" value="Y"><label for="CanceledY">Yes </label></span>

You can enter radios into [field templates] using [square brackets].

[radios:yesno:[DATA]:autoupdate]
Definitions
deleteedit260Query StringsA query string is part of a <a href="db.aspx?t=HelpTopics&id=261&vid=11">url</a>. The query string is one of Qrimp's most powerful customization tools. We encourage you to take some time to experiment with query strings.

<img class="border" src="attachments/developer.qrimp.com-673f6e13-700d-4bf6-b028-94ca0b22aab9/querystring.png" />
<span class="small">The query string that pulls back the current record from the help topics table</span>

In general, a query string will allow you to specify the source of your data (the table) and select which data from that table to display. You can also use a query string to format and filter your data. You can even limit which data within a particular record you would like to display.

A query string contains [query string parameters] that identify which data to pull back and how to display it.

The rules of <a href="http://en.wikipedia.org/wiki/Query_string" title="Read more about Query Strings at Wikipedia">Internet URL Query String Syntax</a> specify that the first parameter after the .aspx should be a ?. All subsequent parameters should be prefixed with an &.
Navigation
deleteedit263web browserA program used to browse the internet. Common web browsers are Chrome, IE, Firefox, Safari and Opera.

<img class="border" src="attachments/developer.qrimp.com-aeee3ea5-8820-43ec-aa22-10774895d5af/webbrowsericons.png" />
<span class="small">Some web browser icons</span>

Many smart phones have built-in web browsers.
Definitions
deleteedit25Many-to-ManyA many-to-many relationship is a relationship between two <a href="db.aspx?t=helptopics&id=252&vid=11">database tables.</a> For example, a stuedent in university will have many teachers, and a teacher will have many students. The relationship between the two tables is a many-to-many relationship between students and teachers.

<h2>Adding a Many-to-Many</h2>
To add a many-to-many relationship first go to the table for which you'd like to create the relationship, then go to Develop > Add Many-to-Many.

At the top of the page, you'll see the table you selected, and a drop down list of other tables in your system. Select the table to which you'd like to add the relationship and then name the relationship. Usually something simple such as TeacherStudents or UserTasks is best.

Click create to add the relationship. You will see two links that allow you to view data in either of the tables.

<h2>View the Relationship</h2>
To view the relationship go to the detail view of any item in either of the two related tables. On the right hand side of the page, you will see a heading/link to the relationship. If there are related items, they will be listed below the link. There is also an add button so you can add new items.

<h2>Advanced - viewing all relationships in your system. </h2>
To see a list of all existing relationships, go to Develop > Many-to-Many.
The System Tables
deleteedit107Creating a Look-up TableA look-up table lets you select data from a drop-down list in any one of your tables. Like this:
<img class="border" src="/attachments/96528c8f-71d0-4a7f-aa82-9cdb855b19d1/ClientDropDown.png">

To let the system know which table you want to pick from, you have to create a look-up table.

<h2>Adding a look-up table with Import Data</h2>
If you are adding a look-up table with a lot of records, [Import data] is the fastest way to create it.

Go to Develop > Import Data.

<img class="border" src="/attachments/ef4d0248-5e5a-4b93-97ca-c283b88af827/importdata.png"

Enter a Table Name.

<img class="border" src="/attachments/6d8a61f7-366c-42f6-99c0-4746a9ea6680/EnterTableName.png">

Check the checkbox beside "First row contains field names".

In the box below, enter:

Clients
XYZ Company
ABC Inc
JKL Manufacturing
etc....

Then click "Import Data!". Leave the advanced features
unchecked for look-up tables.
<img class="border" src="/attachments/55744fd5-fa15-4c4f-ba22-0b4b094d2473/LookupTableCreation.png">

<img class="border" src="/attachments/535691ad-592b-4fad-9114-99e157a53c8e/Lookup4.jpg">

See also [Convert a Field to a Drop-Down] and [Adding a Drop-Down Field]
Add a Table
deleteedit256Adding a Calendar List PortalA list of upcoming events on your [Dashboard] can help you see what you need to do this week. You will need to have the Calendar and Custom Views modules installed (see: [Modules]).

<img class="border" width="600" src="attachments/developer.qrimp.com-14857d23-63f4-4b4c-a3fd-a6a9f85a0a7d/calendarlistportalamongothers.png" />

<h2>Adding a Calendar List</h2>
In your menus, go to > Calendar > Event List

<img class="border" src="attachments/developer.qrimp.com-ba59a75a-cbf8-4706-9d8a-a3b1e44df7ab/clickcalendar.png" />
-------

You will see a list of all events. You need to filter this using custom views, so that you see only today's and future events. You must have the custom views module installed.

<img class="border" src="attachments/developer.qrimp.com-437ea09e-aabb-40cd-b126-e2a87a339bdc/listofeventscalportal.png" width="500">
-------

At the top of the list, click "Add New View".

<img class="border" src="attachments/developer.qrimp.com-88de3bc3-69ca-45ca-a185-6979a2dfa4ab/addcaleventsviewforportal.png " />
-------
Enter a name for your view. "Calendar" will be fine. Don't select it as the default view.

<img class="border" src="attachments/developer.qrimp.com-b928d515-c7ba-4b60-9040-8c05d03ecef0/caleventsviewportal-calname.png " />
-------
Select the "Name", "BeginAt" and "StartDate" columns from the list.

<img class="border" src="attachments/developer.qrimp.com-553e0f3e-4d27-4714-b838-e5c228743f88/namebeginatstartdatecalportal.png" />
-------
Sort by Start Date.

Group by Start Date.

<img class="border" src="attachments/developer.qrimp.com-c971f335-2a91-42d2-b5ae-585a78b2ad25/sortandgroupbystartdatecalportal.png " />
-------
Filter the view. Select "Start Date", "greater than or equal to" and "Today".

<img class="border" src="attachments/developer.qrimp.com-bd3987db-3ef8-4dbf-b6f0-cabc84177b42/filtercalportal.png " />
-------
Select the user groups and users who should be allowed to see this view. There is nothing private in our calendar so we make it available to every user group except anonymous. <em>Note: this will not add the portal for those users or groups. Users can add a portal using [Portal Subscriptions].</em>

<img class="border" src="attachments/developer.qrimp.com-c61e2996-ed40-43d8-9c0c-dda8a42282cf/viewpermissionscalportal.png " />
-------
Save your view.

<img class="border" src="attachments/developer.qrimp.com-d4657e18-4a33-47c3-8be3-a17d2ba150a2/saveview.png" />
-------
You will see your new view. At the bottom is a link to share it. Click the share link.

<img class="border" src="attachments/developer.qrimp.com-a055d3d6-38d8-4a0f-b160-4a3682d137ac/caleventsviewshare.png " />
-------
You will see a link to add to Dashboard. Click the "Add to Dashboard" link.

<img class="border" src="attachments/developer.qrimp.com-561532ae-f328-47cc-b2ae-7a0e63a8ef41/addcalportaltodashboard.png " />
-------
Name your new calendar view. "Calendar" is a good name.

<img class="border" src="attachments/developer.qrimp.com-b3e6d4e2-6717-4e5c-beb7-085cccef27f8/calltheportalcal.png" />
-------
Click the "View Your Dashboard Now" link.

<img class="border" src="attachments/developer.qrimp.com-79941e05-8151-4c16-bd7e-81ac824eea07/viewdashboardnowcalportal.png" />
-------
Your calendar is now a portal window on your dashboard.

<img class="border" src="attachments/developer.qrimp.com-8352611c-34af-4bd0-b11f-52e938f7fafd/callistondashboard.png" />
-------
Dashboard
deleteedit1327Add My Task List to a PortalA list of tasks on your [Dashboard] can help you see what you need to do this week. You will need to have a tasks table.

In your menus, go to Tasks.

<img class="border" src="attachments/developer.qrimp.com-e9fb95cf-d97d-4c1b-8196-e71bd73a331e/gototasksmenu.png">
----
You will see a list of all tasks.

<img class="border" src="attachments/developer.qrimp.com-91655928-9af7-49a0-be3c-19d658c27e8e/taskslist.png">
----
Search the tasks list for tasks that are assigned to you.

<img class="border" src="attachments/developer.qrimp.com-feb0c8af-bc8b-4307-b95c-30737f509286/tasksassignedtodropdownsearch.PNG" />

Now that you see a list of tasks assigned to you, look at the bottom of the page, below the tasks. There is a link that says "Share". Click the share link.

<img class="border" src="/attachments/developer.qrimp.com-057e6e67-b784-4916-bce7-684f1f5cdeb6/tasksassignedtodemo.png" />
-------

You will see an add to Dashboard button. Click "Add to Dashboard".

<img class="border" src="attachments/developer.qrimp.com-561532ae-f328-47cc-b2ae-7a0e63a8ef41/addcalportaltodashboard.png " />
-------
Name your new tasks portal.

<img class="border" src="attachments/developer.qrimp.com-ac5166f6-5553-4623-89ae-d8bc32c38087/calltheportaltasks.PNG" />
-------
Click the "View Your Dashboard Now" link.

<img class="border" src="attachments/developer.qrimp.com-79941e05-8151-4c16-bd7e-81ac824eea07/viewdashboardnowcalportal.png" />
-------
Your tasks are now a portal window on your dashboard.

<img class="border" src="attachments/developer.qrimp.com-58e4733a-4a82-4b0a-8cc0-9a62c384250f/tasksportal.png" />
-------
Dashboard
deleteedit183ChartsA Help Topic to step through the value of Qrimp's Charts.


In every grid view in your Qrimp Application at the bottom of the data there are a few default buttons.<br><br> <img src="https://developer.qrimp.com/attachments/cd72c5a9-c5c3-4a42-a07f-b473b909f2f6/Charts1.png">

Qrimp does offer a few canned [Reports] but to get your hands dirty with your data Qrimp has Custom and Cross Tab Reports.

When you are in the Grid View, one of the default buttons in the [Content Header] is Reports. If you click on that you will get a screen similar to this <br><br> <img src="https://developer.qrimp.com/attachments/7f9261ba-9fa6-44e0-82ad-30b285b09be9/Charts2.png">

Once you are at this screen you can now see the buttons in the [Content Header] that say Custom and Cross Tab Reports.

Here is an example of a Cross Tab Report. The data is from 2006 and 2007 Most Expensive Zip Codes in the US ranked by Average Median Sale Price. The Report compares the Counties year over year.

<img src="https://developer.qrimp.com/attachments/3333ff85-1242-45a7-b436-92f2a9858993/Chart3.png">

To CHART this Cross Tab report we can go to the bottom of the data and click 'Chart' it will take you to a screen like this.

<img src="https://developer.qrimp.com/attachments/b5afa6f3-8ffc-44cf-9cb3-21646fd50143/Charts4.png">

There are several ways to change the look and feel of your chart.

Lets begin with the Chart Title. The Chart title will appear above the Chart.

<img src="https://developer.qrimp.com/attachments/1df430b9-0290-4316-b0c6-b6e68fce36df/NewChart1.png">

The View Next button allow you to scroll through various charts to represent the data in a different way. Here is the same chart as above after Clicking "View Next". You can also use the Drop Down Menu located to the left of the "View Next" button.

<img src="https://developer.qrimp.com/attachments/38c41591-9509-4a97-acd5-5d01c01a9159/NewChart2.png"

The Show Top field allows for adjust of records you want to see. In the two images below is of the same Chart but different amount of records displayed just by changing the "Show Top" field.

<img src="https://developer.qrimp.com/attachments/0d0cc91d-9f06-464b-adee-28f596656497/NewChart3.png">

<img src="https://developer.qrimp.com/attachments/be27b6fc-3b8d-40c8-b815-276438727ef8/NewChart4.png">

The Order By Column allows you to switch the order by which the graph is displayed. By default it is ascending but the radio button next to the field allows you to order by descending as well. This can be seen in action in the two images below.

<img src="https://developer.qrimp.com/attachments/bb041126-8a51-4ec2-b055-059f51b42e97/NewChart6.png">

<img src="https://developer.qrimp.com/attachments/02b7de26-aaf1-469c-842a-e47299079acb/NewChart5.png">

The Dimensions of the Chart can be changed to make the graph more readable. This might be used if the data set is large and the default width and height need to be expanded. The first image is the default size and the second image changes the width and height to make the graph a little more readable.

<img src="https://developer.qrimp.com/attachments/d76c8817-2e05-480c-ba06-e5090ae0aaa5/NewChart7.png">

<img src="https://developer.qrimp.com/attachments/582b3606-fd4e-47bf-af28-ae24af826bac/NewChart8.png">

Sometimes on the x-axis the labels get jumbled together, like the first image below. To make the graph a little more readable there is a Rotate Names radio button that will rotate the names vertically, like in image two.

<img src="https://developer.qrimp.com/attachments/98044458-6b7b-4ab5-bb41-28cfbfeb1e32/NewChart9.png">

<img src="https://developer.qrimp.com/attachments/a44a29d1-f8d8-4ce2-97ec-6e4063f83ead/NewChart10.png">

The "Animate" radio button adds a little functionality to your Chart. If you check the button and click "Show Chart" it will build the Chart right before your eyes. Watch the video below to see it in action.

<embed src="https://developer.qrimp.com/attachments/f5877535-d760-42e0-9d37-a6853c5f72fa/NewChart11.swf" autostart=false height=500 width=1100 />

Sometimes the graphs don't tell the whole picture. By adding values to a chart the User will know the exact amount. So, by clicking the radio button next to "Show Values" the Values will appear on top of the bars, like in image two.

<img src="https://developer.qrimp.com/attachments/bfcb17e4-5e4c-4342-bf59-5772916a18a6/NewChart11.png">

<img src="https://developer.qrimp.com/attachments/05a2d9bf-e70d-48a7-a139-6d0c06de83ed/NewChart12.png">

To make graphs more readable you can add colors to distinguish between each type of bar. By clicking on the palette a color picker box will appear (image 2) and because I have three different labels I will click three different colors. There is no need to close the box each time.

<img src="https://developer.qrimp.com/attachments/3bcf4f9d-5875-43d0-a24d-430126e28c96/NewChart13.png">

<img src="https://developer.qrimp.com/attachments/b7bd7129-f898-4057-b28d-ce7e99938fe1/NewChart14.png">


<strong>The Share button can be used to add Charts to your Portal page. Here is a help topic that will walk you through the process. [Creating A Portal with a Chart]</strong>
Data Analysis
deleteedit1264drop-downA drop-down list box is also known as a select list, look-up table or a pick-from list.

When you are adding records, drop-down lists increase data accuracy by letting you select data from a list rather than type it in. Drop-down are particularly useful for oft-repeated data entry fields, like "Country" "Status" or "Category".

Drop-downs are also used to connect a record to an item in a related table. For example, if you were entering a new Project, the drop-down for the "Manager" field, would be a list of Employees.

<h2>Sample Drop-down</h2>

<select name="datatype0"><option value='decimal(18, 2)'>Number with decimals</option><option value='int'>Number without decimals</option><option value='datetime'>Date/Time</option><option value='varchar (2)'>Text (2 characters)</option><option value='varchar (50)'>Text (50 characters)</option><option value=''>-- picklist from --</option><option value='pickfrom_accounttypes'>accounttypes</option><option value='pickfrom_t_furcolor'>furcolor</option><option value='pickfrom_t_users'>t_users</option><option value='pickfrom_t_views'>t_views</option><option value='pickfrom_yesno'>yesno</option></select>

See also:
[Look-up Tables]
[Convert a Field to A Drop-Down]
[Add a Drop-Down Field]
[Hide Inactive Fields from Drop-Downs]
Definitions
deleteedit1342Default FieldsA default field is the field from any table that is displayed in a related table or on the calendar view.

<img class="border" width="550" src="http://developer.qrimp.com/attachments/developer.qrimp.com-b6d0bb35-3e7a-4294-9174-523e20fd428a/defaultfieldinrelateddata.png" />

If no default field is selected, Qrimp will use the first text field in your table as the default field. If there is no text field, Qrimp will use whichever field comes first.

<h2>Changing the Default Field</h2>
To change the default field, go to your table, then click the Table Management sub-menu.

At the top of the table management page, click the link that says "Configure Table Settings".

In the defaultfield drop-down, select the name of the field you want to appear.
<img class="border" src="http://developer.qrimp.com/attachments/developer.qrimp.com-4470af98-dea4-4014-994e-61ddb6092df5/changedefaultfieldtodescription.png" />

In this example, we will change the field from being the name of the timesheet to the description.


Table Settings
deleteedit42DatatypeA datatype is a type of data. Some data types include currency, decimals, text, date/time, yes/no and [look-up tables]. Choosing a datatype allows you increase data accuracy by restricting which kind of information users can enter when they are creating new records.

<h2>Data Accuracy</h2>
Choose a datatype that accurately describes which type of data a field will contain will make your application more efficient and less error-prone. It will also make any reports and charts you generate more precise. Think carefully about which datatype is most appropriate for your field. If you create a field called HireDate in your Employees table, choose the datatype date/time, users will only be able to enter properly formatted dates. If you chose a less specific datatype, such as Multi-line text, employees could enter the entire story of how they were hired in the HireDate field.
Definitions
deleteedit252Database tableA database table is the master sheet of data in a particular area. It is best to create a new database table for each separate type of thing ie: Contacts, Contact Type, Employees, Inventory, Tasks, Invoices, etc. See also [Introduction to Tables].

To see all of your database tables go to Develop > Manage Tables. (See also: [Manage Tables])

Database tables can be linked together with relationships. For example, one employee may be related to many tasks. This would be a 'many-to-many' relationship. See [Many-to-Many].
Definitions
deleteedit1335Add Select List with Square BracketsAn Introduction to Qrimp">Square Brackets
deleteedit1334Add a radio button[radios:yesno:[DATA]:autoupdate]Square Brackets
deleteedit230Adding Modules[Modules] are sets of [database table]s that add functionality instantly.

To add a module go to Develop > Add Module

Your module is added instantly. You may see new menus across the top that allow you to access the new tables. Sometimes you will not, for example, the "Countries" module simply adds the countries table to your list of tables. You can then use this as a look-up table (see [Look-up Tables]) in your other tables.
Modules
deleteedit225Messaging Module

Select the user(s) to send the message to by clicking a username, or enter an email address into the users box. Messages sent to external recipients via email will not be logged in the Messages table by default.
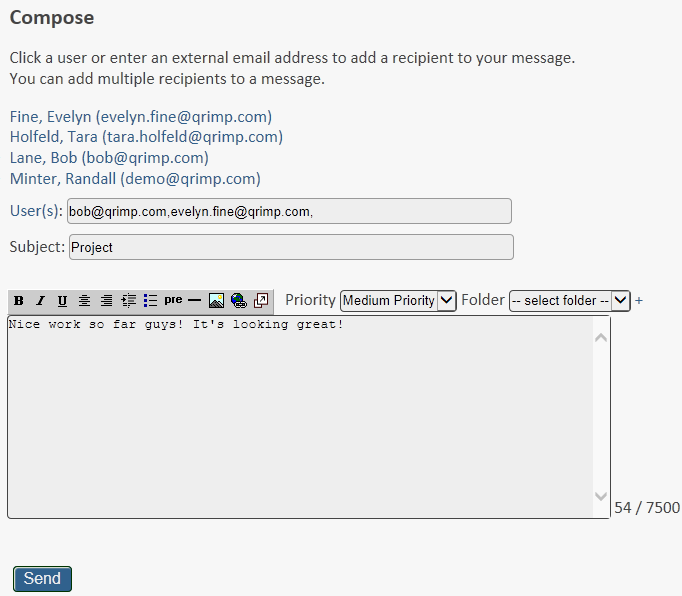
Logging messages sent to external email addresses

To track messages sent to external email addresses go to Develop > Manage Tables. Select the Messages table and click "edit". Add a field called ToEmail with a data type of Email Address.

Creating Contacts Automatically

You can set up your Qrimp app to automatically create an entry in your Contacts table when you send an email to a new external contact. If you do not have a contacts table, create a table with at minimum the fields mentioned below. If you already have a Contacts table, go to Develop > Manage Tables, select Contacts > edit, and add the following columns:

Name - Single Line Text 100 Description - Multiline text 500 or greater Email - Email Address

Now when you send a message to an external email, the Name and Email fields will both show the email address. The description field will indicate that the contact was created from a message from within your Qrimp app. You can edit these fields later with more details.

Logging Contact Interactions

If you have or create an Interactions table, you can log interactions with existing contacts using the Qrimp messaging system. First, follow the instructions above for "Creating Contacts Automatically". Then add a table called Interactions, or add the following columns to your Interactions table:

Name - Single line Text 255 ContactId - Pick From Contacts InteractionDate - DateTime Description - Multiline Text 5000+

Click the check boxes for auditing and versioning.

Once you've built the contacts and interactions table, messages you send to external users from your Qrimp app will be logged. This data makes a great addition to a CRM and can be very useful on [Reports].

Messaging about items in your database tables

To use this feature, you must be comfortable with query string urls.

You can add the ability to see messages about an item in a table. First, add two additional fields to the messages table:

TableId - Pick From Table Settings ItemId - Number without Decimals
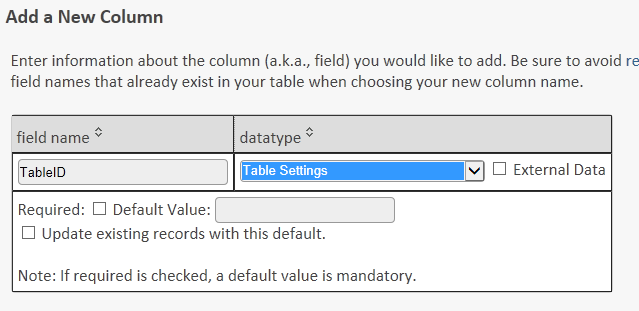
To send a message about a particular item, you must type in a url table that references the table you are mentioning. If you include a parameter to the tableid and itemid of an entity in your Qrimp App, the message will be created with the tableid and itemid specified. You can create the link like this: messages.aspx?t=messages&compose=new&tableid=1000&itemid=1

In this case, the message will be logged as being sent about item 1 in the table 1000.


<!--
This is being managed under the Communications section Messaging help topic and thus it is included here.

The messaging module includes an internal email-like
communication tool. It will let you send emails to users in your system. There are special features of the messaging system built in if your system is configured to enable these features.

<h2>Sending messages to other users of your Qrimp App</h2>
To Send an internal message, just click the link that says "Users" and pick the user to send the message to. The Qrimp Messaging system keeps track of the date the recipient read the message, which will help you communicate better by knowing if your messages are received.

<h2>Sending messages outside the system</h2>
The base messaging module will let you send emails outside the system by entering a remote email address into the users box. By default, the messages sent to external recipients via email address will not be logged in the Messages table. If you want these messages logged, you must add an additional field to your Messages table called "ToEmail" without the quotes and a data type of Email Address.

Below, we describe even more advanced ways to log emails sent externally.

<h2>Messaging about objects in your database</h2>

After you add the messages module, you may want to add two additional fields to the messages table that is created.

TableId = Pick From Table Settings
ItemId = Number without Decimals

If you link to the messages module and include a parameter to the tableid and itemid of an entity in your Qrimp App, the message will be created with the tableid and itemid specified. You can create the link like this:
messages.aspx?t=messages&compose=new&tableid=1000&itemid=1

In this case, the message will be logged as being sent in regards to the item with id of 1 in the table with id 1000.

<h2>Creating Contacts Automatically</h2>

If you'd like to send an email to someone outside your Qrimp App and simultaneously create a new contact in your Qrimp App for that recipient, you just need to add a Contacts table with the following fields:
Name - Single Line Text 100
Description - Multiline text 500 or greater
Email - Email Address

Then, whenever you send an email to a new email address, a contact for that person will be added to your database automatically. The Name and Email fields will both be set to the email address and the description will let you know the contact was created by sending a message from within the system.

<h2>Logging Contact Interactions</h2>

Like adding contact automatically, Qrimp can also log your interactions with those contacts through the internal messaging system. For this to work, your Qrimp App must have the Contacts table as described above plus an additional table called Interactions as described below. Be sure to create your table with the name "Interactions" without the quotes.

Fields Required on the Interactions Table:
Name - Single like Text 255 (Enough to accommodate the subject line)
ContactId - Pick From Contacts
InteractionDate - DateTime
Description - Multiline Text 5000+ (Enough to hold the message body)

You also click the check box for auditing so a createid and createdate field are added to the table.

Once you've built the contacts and interactions table, all messages you send from within your Qrimp App will be logged in these tables and you can write reports and integrate the messaging system into a larger CRM.


-->"> Install the messaging module to send messages in your Qrimp app. See [Adding Modules]

Sending Messages

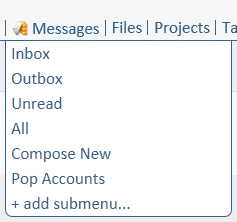
To send a message, go to Messages > Compose New.
Select the user(s) to send the message to by clicking a username, or enter an email address into the users box. Messages sent to external recipients via email will not be logged in the Messages table by default.

Logging messages sent to external email addresses

To track messages sent to external email addresses go to Develop > Manage Tables. Select the Messages table and click "edit". Add a field called ToEmail with a data type of Email Address.

Creating Contacts Automatically

You can set up your Qrimp app to automatically create an entry in your Contacts table when you send an email to a new external contact. If you do not have a contacts table, create a table with at minimum the fields mentioned below. If you already have a Contacts table, go to Develop > Manage Tables, select Contacts > edit, and add the following columns:

Name - Single Line Text 100 Description - Multiline text 500 or greater Email - Email Address

Now when you send a message to an external email, the Name and Email fields will both show the email address. The description field will indicate that the contact was created from a message from within your Qrimp app. You can edit these fields later with more details.

Logging Contact Interactions

If you have or create an Interactions table, you can log interactions with existing contacts using the Qrimp messaging system. First, follow the instructions above for "Creating Contacts Automatically". Then add a table called Interactions, or add the following columns to your Interactions table:

Name - Single line Text 255 ContactId - Pick From Contacts InteractionDate - DateTime Description - Multiline Text 5000+

Click the check boxes for auditing and versioning.

Once you've built the contacts and interactions table, messages you send to external users from your Qrimp app will be logged. This data makes a great addition to a CRM and can be very useful on [Reports].

Messaging about items in your database tables

To use this feature, you must be comfortable with query string urls.

You can add the ability to see messages about an item in a table. First, add two additional fields to the messages table:

TableId - Pick From Table Settings ItemId - Number without Decimals

To send a message about a particular item, you must type in a url table that references the table you are mentioning. If you include a parameter to the tableid and itemid of an entity in your Qrimp App, the message will be created with the tableid and itemid specified. You can create the link like this: messages.aspx?t=messages&compose=new&tableid=1000&itemid=1

In this case, the message will be logged as being sent about item 1 in the table 1000.


<!--
This is being managed under the Communications section Messaging help topic and thus it is included here.

The messaging module includes an internal email-like
communication tool. It will let you send emails to users in your system. There are special features of the messaging system built in if your system is configured to enable these features.

<h2>Sending messages to other users of your Qrimp App</h2>
To Send an internal message, just click the link that says "Users" and pick the user to send the message to. The Qrimp Messaging system keeps track of the date the recipient read the message, which will help you communicate better by knowing if your messages are received.

<h2>Sending messages outside the system</h2>
The base messaging module will let you send emails outside the system by entering a remote email address into the users box. By default, the messages sent to external recipients via email address will not be logged in the Messages table. If you want these messages logged, you must add an additional field to your Messages table called "ToEmail" without the quotes and a data type of Email Address.

Below, we describe even more advanced ways to log emails sent externally.

<h2>Messaging about objects in your database</h2>

After you add the messages module, you may want to add two additional fields to the messages table that is created.

TableId = Pick From Table Settings
ItemId = Number without Decimals

If you link to the messages module and include a parameter to the tableid and itemid of an entity in your Qrimp App, the message will be created with the tableid and itemid specified. You can create the link like this:
messages.aspx?t=messages&compose=new&tableid=1000&itemid=1

In this case, the message will be logged as being sent in regards to the item with id of 1 in the table with id 1000.

<h2>Creating Contacts Automatically</h2>

If you'd like to send an email to someone outside your Qrimp App and simultaneously create a new contact in your Qrimp App for that recipient, you just need to add a Contacts table with the following fields:
Name - Single Line Text 100
Description - Multiline text 500 or greater
Email - Email Address

Then, whenever you send an email to a new email address, a contact for that person will be added to your database automatically. The Name and Email fields will both be set to the email address and the description will let you know the contact was created by sending a message from within the system.

<h2>Logging Contact Interactions</h2>

Like adding contact automatically, Qrimp can also log your interactions with those contacts through the internal messaging system. For this to work, your Qrimp App must have the Contacts table as described above plus an additional table called Interactions as described below. Be sure to create your table with the name "Interactions" without the quotes.

Fields Required on the Interactions Table:
Name - Single like Text 255 (Enough to accommodate the subject line)
ContactId - Pick From Contacts
InteractionDate - DateTime
Description - Multiline Text 5000+ (Enough to hold the message body)

You also click the check box for auditing so a createid and createdate field are added to the table.

Once you've built the contacts and interactions table, all messages you send from within your Qrimp App will be logged in these tables and you can write reports and integrate the messaging system into a larger CRM.


-->
Modules
deleteedit1328Checkboxes<textarea>[checkbox:[DATA]:autoupdate]</textarea>

Only use autoupdate if you want editing to be enabled from the view.
Square Brackets
deleteedit1300Add a User Group<span class="error"><em>Caution: If you add a user group, they will need permissions added manually to all tables and menus. They may also need permissions added to many [system tables] - portals (to see portals), queries, t_group_query, views etc. If any of this is done wrong, the user will not see things they should see.</em></span>

To add a new user group go to Admin > Manage Users.

Click the link on the top of the page that says "Manage Security Groups".

<img class="border" src="attachments/developer.qrimp.com-8b442862-ce60-4548-813d-75777ddc0543/managesecuritygroups.png" />

----

Click the "Add New" button to add a new security group.

To edit the settings for an existing security group, click the edit icon.

<img class="border" src="attachments/developer.qrimp.com-a46644f2-09a1-41a5-942e-3fd91e1c5d51/usergroupsettingeditusergrouporaddnew.png" />
User Groups
deleteedit69focuson Query String Parameter<nobreak><img src="/attachments/3ddae741-1e95-4629-8d44-879dbec2b8e1/focusonQueryString.png"><br/>

<p>When entering a url into the link section of a Menu tab, add a query string parameter called "focuson" with a value of the name of a field in your table to make the cursor appear in that field when the page loads.</p>

<h2>Example</h2>
<p>Your users would like to have the mouse cursor in the Name field when they load a Contacts form, so you add &focuson=name to the end of the query string on the menu that takes them there (see [Menus]).</p>
</nobreak>
Query String Parameters
deleteedit176Views<nobreak>
Views are ways of displaying data on the page. Qrimp can display data in a table, a photo gallery, XML, or a large number of other layouts. Views are also used to let you edit data or rearrange it on a page. Advanced developers can also use views as page templates to add new layouts using <a href="db.aspx?t=HelpTopics&id=203&vid=11">HTML</a> and Qrimp's [square brackets] notation.

Qrimp also has [Custom Views (Sorting and Filtering)]

<h2>Basic Views</h2>
Frequently used views are linked to by default in the [Content Header] with the following icons:<br/>
[Calendar View]  <img align=absmiddle src="icons/crystal_project/32x32/apps/cal.png"><br/>
[Tree View]  <img align=absmiddle src="icons/crystal_project/32x32/actions/view_tree.png" alt="Tree View"/> <br/>
[Grid View]  <img align=absmiddle src="icons/crystal_project/32x32/actions/view_text.png" alt="Grid View"/> (Also called list view or table view).<br/>
[Grid Edit]  <img align=absmiddle src="icons/crystal_project/32x32/apps/kate.png" alt="Grid Edit"/><br/>

Each Qrimp app comes with many default views.

<h2>Creating links to Views (for menu tabs and more)</h2>

In the location bar of your browser, you'll see the <a href="/db.aspx?t=HelpTopics&id=261&vid=11">url</a> you are on ie: "http://myapp.qrimp.com/db.aspx?t=customers&id=2&vid=11". The vid=11 tells the app to use view 11, which is the detail view. Changing the vid in your url will show you a different view. Note that if you are on a custom page or a page with a [clean url]) you will not see the vid. (See also [Query String Parameters])
Click the "Customers" tab to see the following screen, customers, displayed in Grid View (vid=1).

<img src="attachments/de08c23c-a1b5-4c0d-9972-4ff0c4668c17/ShipCustomer.jpg">

Try to open a table with the XML View, which has an id of 19. Go to a table and edit the query string in the URL so that "vid=19". Qrimp will apply the XML View to the data being returned on the page.

<img src="attachments/be8b1ffe-a495-41a4-8fba-a7ef3d8cad2f/XMLvIew.jpg">

<li>Here is a list of fields for a template and what they mean:
<h5>Name</h5>
<p>This is the name of the view for easy reference or for adding to the query string using the vid=name parameter. You can also use the ID of the view.
<h5>Description</h5>A description of your view
<h5>Displayid</h5>This tells Qrimp how to display the data, do you want your data in a table format like in the grid view or do you want it in a list. Most views you create will be a repeater. These controls are based on the ASP.NET <a href="http://msdn.microsoft.com/en-us/library/system.web.ui.webcontrols.repeater.aspx">Repeater Control</a> and the <a href="http://msdn.microsoft.com/en-us/library/system.web.ui.webcontrols.datagrid.aspx">DataGrid Control</a>.
<h5>Header</h5>The header content will appear above any data that is pulled from the database.
<h5>Footer</h5>The footer content will appear below any data that is pulled from the database.
<h5>ItemTemplate</h5>The item template is the HTML code that formats the display. If you are using a Repeater type view, then this HTML will format one complete record from the database. In a table type view, the item template will be applied to each column. In the table view, if there is no item template, then the template for the column is obtained from the [Field Templates].
<h5>CellTemplate</h5>In a repeater view, this should probably always be [DATA]. If you'd like to wrap the item template with an extra bit of HTML, you can add it here.
<h5>PageSize</h5>How many records to display by default. You can override this setting in the url using the &pagesize= parameter.
<h5>ContentType</h5>The content type tells the browser how to display the data. If blank, text/html is assumed. If you want to display xml, use text/xml.
<h5>EnableWiki</h5>If EnableWiki is true, square bracketed items will be hyperlinked.

<h2>Advanced: Building a New View</h2>
The easiest way to create your first View is to copy an existing view and then modify it. To copy a View, Go to Design > Views > Select the edit icon next to the View you want to copy > Scroll down to the bottom of the page > click the Copy button > Click the edit icon > edit the HTML > Save your edits with a new name.
</nobreak>
Display and Design
go to page: 1 2 3 4 5 6 7 8 9 10 243 records. Showing