Search the help documentation

Search:

Can't find what you are looking for? Use the Feedback tab in your app to submit an issue, or email support@ qrimp.com.


idnamedescriptionParentTopic
deleteedit1326Working Offline, Backing Up, Getting Data out
deleteedit38Introduction to Tables<!--<nobreak-->
Tables are the core of a Qrimp database application. All of your data is stored in tables. Once you have created tables, you can enter data, delete tables and rows, add columns, view [Reports], choose different data [views] and more.

A table in your Qrimp application is composed of many records (also known as fields or items) stored in columns. Each field will contain data about a particular item in a table. For example, if I create a table for TeddyBears the fields might be Name, FurColor, PurchaseDate, etc.

Each field has an id number, which helps you track that item. The first bear I enter into the TeddyBear table will have an id of 1.

You can see the tables in your application by going to Develop > Manage Tables. You can change the way the data in a table is displayed with [Views], and change the way it is navigated to using [Navigation] options.

See also Definitions: [database table].
<!--</nobreak>-->
An Introduction to Qrimp
deleteedit8An Introduction to Qrimp<!--<nobreak>-->
<h3>What is Qrimp?</h3>
Qrimp is a web platform that allows you to create and operate your own custom information management system.
<h3>How does it work?</h3>
When you create an app, you get a url, such as http://myapp.qrimp.com, plus a login and password by email. When you log in to your Qrimp app you have the tools you need to build custom solutions for any type of software system and manage your data securely on the web.
<h3>What is Qrimp for?</h3>
Qrimp is used to create web-based software applications with forms, workflow, reporting, business rules, data views, design templates and more. You can start with your existing data or add data as you go. Some types of software that have been built on Qrimp include Customer Relationship Management, Inventory Management, Enterprise Resource Planning, Supply Chain Management, Knowledge Management, Digital Asset Management, Financial Management, Human Resources, Intranet and more.

<h3>How do I sign up?</h3>
If would like to create a new web application for yourself or your company, go to<a href="http://www.qrimp.com/signup.html"> www.qrimp.com/signup</a>. If your company already has an app, speak to your administrator and they will create an account for you.

<h3>How do I access it?</h3>
Qrimp systems are accessible online any time from any web browser, including mobile phone browsers. There is no software to download. If desired, Qrimp can be installed behind a firewall on a local machine (see <a href="http://developer.qrimp.com/db.aspx?t=HelpTopics&id=138&vid=11" alt="Qrimp Server">Qrimp Server</a>).

<h3>Who can see my data?</h3>
Qrimp systems are all private by default. If you would like to show data to the public, use the anonymous user group under security permissions (see <a href=http://developer.qrimp.com/db.aspx?t=HelpTopics&id=4&vid=11>User Groups</a>).

<h3>Does Qrimp work with ...?</h3>
Qrimp can integrate with external services for payment processing (PayPal, Authorize.Net), maps, UPS (shipping), Flickr, Twitter, RSS - anything with an API. You can also share data from your Qrimp application to external sites using <a href=http://developer.qrimp.com/db.aspx?t=HelpTopics&id=130&vid=11>Share Data</a>.

<h3>What about my existing files?</h3>
Qrimp lets you upload existing documents, such as Word, Excel, PDF, video, and other files. These documents are stored in Qrimp as attachments. See <a href="db.aspx?t=HelpTopics&id=137&vid=11">Adding Attachments</a>.

<h3>Can you build my system?</h3>
If you do not have the time or knowledge to build your system, the Qrimp Services team can provide help. If you'd like our help, please <a href="http://www.qrimp.com/contact.html">contact us</a>.
<!--</nobreak>-->
deleteedit123Before You Start<!--<nobreak>-->
<p>Before you get started, think about what your application is for. Which information do you want to track? Which types of users do you want to have? Who will be able to view and change your data?</p>

<p>You may wish to start with a data model. If so, read our [Brief Intro to Data Modeling].</p>

<h2>Basic steps to creating a Qrimp app</h2>

<ol><li>Designing your data model</a></li><li>[Create Tables] <ul> <li>Option 1: Create Tables Manually</li> <li>Option 2: Import Data</li> </ul></li><li>[Entering and Editing Data]</li><li>Customize your Application with<ul> <li>Views</li> <li>Templates</li> <li>Headers and Footers</li><li>Security</li> <li>Menus</li></ul></li></ol>

<p>We recommend drawing out a list of tables and listing the columns you want to have before you get started. You can add additional tables, add rows, delete rows, change data types, and drop columns at any time, so nothing is set in stone. Having a structured idea of what type of database you will build before you start will save you time and help you mentally organize your information first.</p>

<p>There are many resources on the web that teach you about database methodology.<!--We have gathered some links for you here: <a href="db.aspx?t=HelpTopics&id=55&vid=11">Designing your data model</a-->.</p>

<p>Of course, you can also get started with no learning, and figure it out as you go! A good place to start is by adding your first data table. There are two ways to add data: [Create Tables] and [Import Data].</p>
<!--</nobreak>-->
An Introduction to Qrimp
deleteedit234Notification Templates<!--<nobreak>-->
<p>Notification Templates determine the text, images, links and design elements that are in notifications.</p>

<h2>Existing Templates</h2>
<p>Qrimp comes with the following default notification templates: UPDATE, CREATEACCOUNT, APPROVEACCOUNT, PASSWORDRESET, LOGIN, NEWMAIL, ACCOUNTREQUEST, New Suggestion, and New Comment On Suggestion. Use these default templates as the basis for your notifications. You can Copy these to create your own notifications. This will give you a head start on the content that can be displayed. You can also add new templates and start from scratch. </p>

<h3>Update</h3>
<p>Update is by far the most frequently used notification template. This basic template can be used to inform users that new records have been added to tables in your database. </p>

<h2>What's in a Template?</h2>

<h3>Square Brackets</h3>
<p>Notification templates rely heavily on [Square Brackets] to pull information from your database to the email in an automated fashion. Using [Square Brackets] you can show a user the name of the app in the email, which table and item was affected, which user made a change, the date the change was made, and more. Start with the default notification templates and copy/paste pieces of square brackets notation into your notifications.</p>

<img class="border" src="/attachments/developer.qrimp.com-492da2f8-7ce0-44c4-bd44-68b7c0a2422b/notification%20template%20template.png">

<h3>CSS and HTML</h3>
<p>Users familiar with CSS can also include the "<'style'>" tag to put design elements in the notification, such as fonts, colors, borders, backgrounds and more. Depending on the user's email client, the styles may show up differently. If a recipient shows text-only emails, these design settings may not make it through.</p>
<!--</nobreak>-->
Notification Subscriptions
deleteedit16Notification Subscriptions<!--<nobreak>-->
<p>Set up notifications in your Qrimp app to send an email to a user when data is added, deleted or edited. For example, you can set up an email to a sales rep when a table is updated.</p>

<h3>Adding Notifications</h3>
<p>To subscribe a user to a notification, go to Admin > Notification Subscriptions. Click the Add New Icon <img src="/icons/crystal_project/32x32/actions/edit_add.png" />.</p>

<p>Choose the table you want to send a notification for.</p>
<img class="border" width="300px" src="http://f43a933af7ac34dcec6f-e68f0ae55bed6d6f943b932cc8d70ccb.r3.cf1.rackcdn.com/867d5c7f-48c4-4d82-8f51-3a3a8a68e988-custom%20notifications%20screen%201.png">

<p>Choose which operation triggers the notification. The most common operation is insert, which is when someone adds a new record to a table.</p>
<img class="border" width="300px" src="http://f43a933af7ac34dcec6f-e68f0ae55bed6d6f943b932cc8d70ccb.r3.cf1.rackcdn.com/a0f6b54d-ccaa-4bfd-93ad-4daf13586bf8-custom%20notifications%20screen%202.png">

<p>Choose the user who will get the notification.</p>
<img class="border" width="300px" src="http://f43a933af7ac34dcec6f-e68f0ae55bed6d6f943b932cc8d70ccb.r3.cf1.rackcdn.com/51cbd38d-9324-4cdb-bcc9-c5be69dae2c1-custom%20notifications%20screen%203.png">

<p>Then choose a notification message. You can see and edit the content of a notification message by going to Admin > Notification Templates. (See also: [Notification Templates]).</p>
<img class="border" src="/attachments/developer.qrimp.com-1941ee44-967d-422c-8622-b802f1a72ddd/notifications%20screen%204.png">

<h3>Customized Notifications</h3>
<p>You can get very specific about when to send a notification. For example, you may wish to only notify a sales rep, if a website visitor creates a new order with an order type of "Wholesale".</p>

<p>To customize, go to your list of user notifications and click the link that says "customize". Enter the parameters for your notification. Now the user will only get this notification when that specific criteria is met.</p>
<p>You will see an option at the right to "Customize filters for this notification subscription". Click the link then [Search] to further restrict notifications. For example, you could choose to only receive an Email notification when someone inserts a Project into the Projects table with the word "Human Resources" in it.</p>
<!--</nobreak>-->
Communicate and Share
deleteedit226Messages<!--<nobreak>-->
Install the messaging module to send messages in your Qrimp app. See [Adding Modules]
<h2>Sending Messages</h2>
<p>To send a message, go to Messages > Compose New.</p>
<img class="border" src="/attachments/developer.qrimp.com-8012de89-2af9-4047-813a-6abbc9eb3f5e/messages%20screenshot%201.png">

<p>Select the user(s) to send the message to by clicking a username, or enter an email address into the users box. Messages sent to external recipients via email will not be logged in the Messages table by default.</p>
<img class="border" src="/attachments/developer.qrimp.com-9ada4505-9b33-4f8c-81dc-8c78b4efbe81/messages%20screenshot%202.png">

<h2>Logging messages sent to external email addresses</h2>

<p>To track messages sent to external email addresses go to Develop > Manage Tables. Select the Messages table and click "edit". Add a field called ToEmail with a data type of Email Address.</p>

<h2>Creating Contacts Automatically</h2>

<p>You can set up your Qrimp app to automatically create an entry in your Contacts table when you send an email to a new external contact. If you do not have a contacts table, create a table with at minimum the fields mentioned below. If you already have a Contacts table, go to Develop > Manage Tables, select Contacts > edit, and add the following columns:</p>

Name - Single Line Text 100
Description - Multiline text 500 or greater
Email - Email Address

<p>Now when you send a message to an external email, the Name and Email fields will both show the email address. The description field will indicate that the contact was created from a message from within your Qrimp app. You can edit these fields later with more details.</p>

<h2>Logging Contact Interactions</h2>

<p>If you have or create an Interactions table, you can log interactions with existing contacts using the Qrimp messaging system. First, follow the instructions above for "Creating Contacts Automatically". Then add a table called Interactions, or add the following columns to your Interactions table:</p>

Name - Single line Text 255
ContactId - Pick From Contacts
InteractionDate - DateTime
Description - Multiline Text 5000+

<p>Click the check boxes for auditing and versioning.</p>

<p>Once you've built the contacts and interactions table, messages you send to external users from your Qrimp app will be logged. This data makes a great addition to a CRM and can be very useful on [Reports].</p>

<h2>Messaging about items in your database tables</h2>

<p>To use this feature, you must be comfortable with query string urls.</p>

<p>You can add the ability to see messages about an item in a table. First, add two additional fields to the messages table:</p>

TableId - Pick From Table Settings
ItemId - Number without Decimals

<img class="border" src="/attachments/developer.qrimp.com-afdb0129-7497-4379-854e-61824767abc8/adding%20tables%20to%20messages%201.png">

<p>To send a message about a particular item, you must type in a url table that references the table you are mentioning. If you include a parameter to the tableid and itemid of an entity in your Qrimp App, the message will be created with the tableid and itemid specified. You can create the link like this:
messages.aspx?t=messages&compose=new&tableid=1000&itemid=1</p>

<p>In this case, the message will be logged as being sent about item 1 in the table 1000.</p>
<!--</nobreak>-->
Communicate and Share
deleteedit212Importing Large Datasets<!--<nobreak>-->
The following tips and tricks will help you import large datasets. If you are working with a small dataset, you can use the menu item Develop > Import data. See [Import Data].

<h3>Copy Paste from Excel to Form</h3>
Keep the number of rows under 10,000 and the width less than 8,000 characters. We've noticed IE pastes large data sets better than Firefox. Sometimes the browser will crash if you try to paste a very large data set into a text field. So if this happens, try using one of the methods below. You can also paste this data into a .txt file and upload it using the Tab delimited file method described below.

<h3>Tab Delimited File Upload</h3>
One flat file import can be many megabytes, but upload time will depend on your connection speed. Since this is just one flat file, only a single table will be built. All the data should be consistent, meaning all date fields should be valid dates, numbers should all be numbers, no letters in the number fields. These rules apply to all import methods.

<h3>Excel 97/2000 .xls Import</h3>
File size < 20 MB, < 100,000 records per sheet, fewer than 20 sheets. Match sheet names to table names in Qrimp. Use this if you want to build the relational model to support multiple data sets automatically. Each sheet will be a table.

<h3>Importing Large Datasets</h3>
If you are converting an existing application or have extremely large sets of data you need to import, then the web is not a viable option. Because network latency, script timeouts, and other factors designed for a high scale environment like a web application are not designed to accommodate very long running batch processes, we need to import large sets without using the web.

<h3>Qrimp Hosted</h3>
If you are using Qrimp's Hosted solution, you can import data using the Rest-like API. This could take a while with millions of records to import, so in a scenario like this, it may always be best to contact support first. You can also download the [Qrimp Server Installation] and use the method described below.

<h3>Qrimp Enterprise Solution</h3>
If you are using the Enterprise solution installed on your local network, there are many options available for importing data. You will probably want to get help from someone experienced with Microsoft SQL Server to perform one of these import options.

The first step to importing a large data set with Qrimp installed is to define the application. This is usually easiest using Qrimp's web interface to define tables manually. This process will create the underlying primary keys, foreign keys, and support tables needed to run your Qrimp application.

A more difficult, but more flexible way is to define the data model directly using SQL Management Studio, export from UML, Earl, or some other relational modeling tool. For this to work, each table must have an INT IDENTITY field named id.

The next step is to get the data into your data model.

<h3>Data Transformation Services (DTS)</h3>

Qrimp is built on top of the Microsoft SQL Server product, so getting data into Qrimp is similar to migrating data between any existing databases. The best way we have found is to use Microsoft's DTS to import the data. Here are a few resources on the Web to help you understand how to use DTS to import your data.
<a href="http://technet.microsoft.com/en-us/library/ms365330(SQL.90).aspx">
Creating a DTS Package with SQL Server 2005</a>

<a href="http://technet.microsoft.com/en-us/library/ms365330.aspx">Creating a DTS Package with SQL Server 2008</a>

<a title="Permanent Link: Data import / export with SQL Server Express using DTS Wizard" rel="bookmark" href="http://mobiledeveloper.wordpress.com/2007/01/31/data-import-export-with-sql-server-express-using-dts-wizard/">Data import / export with SQL Server Express using DTS Wizard</a>

You can download DTS for SQL Server 2005 Express here:
<a href="http://download.microsoft.com/download/4/4/D/44DBDE61-B385-4FC2-A67D-48053B8F9FAD/SQLServer2005_DTS.msi">http://download.microsoft.com/download/4/4/D/44DBDE61-B385-4FC2-A67D-48053B8F9FAD/SQLServer2005_DTS.msi</a>

<a href="http://www.microsoft.com/downloads/details.aspx?familyid=d09c1d60-a13c-4479-9b91-9e8b9d835cdc&displaylang=en">Download More Microsoft SQL Server 2005 Express Tools Here</a>
<!--</nobreak>-->
Import Data
deleteedit168Forums<!--Qrimp forums let you talk with other Qrimp users. The forums are also frequented by Qrimp Support. We get email alerts when new topics are posted. The forums are a great way to capture knowledge for all Qrimp users.
<a href="https://developer.qrimp.com/db.aspx?t=1001&o=27">
Visit the Qrimp Forums</a>.

<img src="/attachments/037713fb-f4d1-4296-9f0e-c701304d22cb/QrimpForum.png">-->
The Qrimp forums are currently closed. If you are interested in a forum venue for discussing your app with other users, please email support to place your vote for re-opening the forum system.
Thank you.
Getting More Help
deleteedit187Creating a Portal with a Chart<a href="db.aspx?t=HelpTopics&vid=11&id=183">Charts</a> and <a href="db.aspx?t=HelpTopics&vid=11&id=57">Reports</a> make good additions to [portals] as they provide a quick overview of your data.

To add a chart to a portal page, first find the chart of your liking. For the example I'm going to use the most expensive zip codes by county year over year. Before you click the Share button don't forget to copy the script inside the text box. (Shown in figure 2)

<img src="https://developer.qrimp.com/attachments/0ab33145-8a74-4cd7-afa6-4ae6242c25fe/Chart8.png">

After you click the Share button it will take you to a Create portal page.

<img src="https://developer.qrimp.com/attachments/4e51b730-94a0-4e0a-abfe-449d93d4af08/Chart9.png">

After you click the create button you need to add it to your portal page which will be located in the [Header/<strong>Footer</strong>].

<img src="https://developer.qrimp.com/attachments/c1a68be3-2753-462f-a0b7-033e49aadf6b/Portal1.png">

After you add the portal subscription it should look like this:

<img src="https://developer.qrimp.com/attachments/d9b65d72-7919-43a1-b619-ceebe16b7dae/Chart10.png">


Dashboard
deleteedit1329lockedoutusername<em>Note: This help topic is a stub and will be expanded. Please contact support@qrimp.com if you are interested in using this feature and cannot follow these instructions.</em>

Admins can use the squarebrackets variable "lockedoutusername" to create a notification template called "ACCOUNTLOCKOUT" and then subscribe to that in the admin notifications area.

If someone tries to log in and fails a bunch of times and their account is locked out, the subscribers to that notification will get an email letting them know that a user in their app is having trouble and they can meet the issue head-on. The notification template can include a link to a help topic that explains what to do if an account is locked out.
Square Brackets
deleteedit66Showing and Hiding Columns with the Query String<h2><em>Advanced</em></h2>
You can edit a <a href="db.aspx?t=helptopics&id=261&vid=11">url</a> (link) to either show or hide columns in a table.

You can use the hide or select parameters to edit the url in your location bar and change the data that is displayed when you re-load your page.

You can also paste links to modified [query strings] into <a href="db.aspx?t=HelpTopics&id=10&vid=11">Menus</a>, the [Content Header], [Field Templates] and <a href="db.aspx?t=HelpTopics&id=176&vid=11">Views</a>.

<h2>Hidecolumns</h2>
Hidecolumns hides the columns you specify. If you are looking at a table and it is too long, and you don't want to add [custom views (sorting and filtering)], you can quickly edit the url to hide a few of these columns, but every time you refresh the page, you will have to re-hide them.

To hide a columns edit the url as follows:
"https://myapp.qrimp.net/db.aspx?t=mytablename&vid=11&hidecolumns=id,description,priorityid,partnershipagreement"

If you want to save this link as a menu tab, copy it from your location bar and type it into the linktemplate field of your menu tab (See [edit a menu tab]).

<em>Note: Hidecolumns retrieves all of the columns from the database and pulls them into your browser, then hides them from view. For this reason, hidecolumns uses more bandwidth than selectcolumns.</em>

<h2>Selectcolumns</h2>
You can retrieve and display only the particular columns you select using "selectcolumns" in your query string (url). A selectcolumns query is written as follows:
"db.aspx?t=tasklist&selectcolumns=name,duedate,priorityid"

Because showing columns only pulls back the selected columns, it uses less bandwidth than hiding columns.
Query Strings
deleteedit1268Add an Active/Inactive Field<h2>Creating an Active (y/n) Field on an Existing Table</h2>
You may want to mark certain fields inactive. For example, you may have clients that you no longer work with.

Go to the Clients table > click the Table Management sub-menu, or go to table management, find your table in the list and click edit. Add a column called "Active" and make the datatype a yes/no. Click "Add Column". (See [Adding Columns]).

<img class="border" src="attachments/developer.qrimp.com-8d08eab0-68a2-4801-902c-caf536017d54/activeyesno.png" />

Use the [Form Designer] to arrange the new field.

<img class="border" width="600" src="attachments/developer.qrimp.com-45b68ac7-85c7-4771-a2bc-394b36726725/addcolumn.png" />

Update your clients and mark them Active yes or no. [Grid Edit] makes this faster.
<img class="border" src="attachments/developer.qrimp.com-2794f56f-b832-4795-a241-6db680a32290/activeyngridview.png" />

You may also wish to [Hide Inactive Fields from Drop-Downs]
Adding Columns
deleteedit61Table Best Practices<h2>Naming a Table</h2>
When you are creating a table, the table name should be the thing you want to keep track of, ie: "Customers", "Projects" or "TeddyBears". The name you choose should not have spaces and cannot be from the list of [Reserved Words].

<h2>Creating Fields</h2>
Fields are also known are records and are sometimes referred to as columns.

A Field name for the data we want to collect about our "thing" is the type of data we want to keep track of. For example, we may wish to store our TeddyBears Names, so we enter "Name" in the first field. Other fields we may want to keep track of would be FurColor, DateAcquired, Height, etc. The name you choose should not have spaces and cannot be from the list of [Reserved Words].

<h2>Selecting Field Data Types</h2>
Next we have to decide which type of data "BearName" is (see [datatype]). We choose which type of data this will be from the [datatype] drop-down list. If the datatype is a number, a date/time, or text, we choose from the first part of the drop-down list. BearName would be plain text, so we choose "Single-line text - 50 characters". We limit the length of the field to 50 spaces, because we don't want people to enter a lot of text in this field.

<h2>Creating from a Look-up Table</h2>
If we already have a table called 'FurColor' that lists colors of fur, we could choose furcolor from a [drop-down]/pick from/look-up table when we were choosing the [datatype] for the FurColor field. This would enable users entering data in the FurColor field to choose from a drop-down list of fur colors. You can choose these when the data entry options for a field already exist in a separate table. This will link the fields to other tables in your database. See [Look-up Tables]

<select name="datatype0"><option value='decimal(18, 2)'>Number with decimals</option><option value='int'>Number without decimals</option><option value='datetime'>Date/Time</option><option value='varchar (2)'>Text (2 characters)</option><option value='varchar (50)'>Text (50 characters)</option><option value=''>-- picklist from --</option><option value='pickfrom_accounttypes'>accounttypes</option><option value='pickfrom_t_furcolor'>furcolor</option><option value='pickfrom_t_users'>t_users</option><option value='pickfrom_t_views'>t_views</option><option value='pickfrom_yesno'>yesno</option></select>
Building Your System
deleteedit221Document Folders<h2>Navigating Document Folders</h2>
To view your document folders go to Documents > Document Folders

<img class="border" width="" src="http://f43a933af7ac34dcec6f-e68f0ae55bed6d6f943b932cc8d70ccb.r3.cf1.rackcdn.com/f7d9d71b-50f1-4739-b466-031c596493aa-document%20folders%20screen%200.png" />

You will see your top level document folders. Top level folders may or may not contain subfolders.

<img class="border" width="" src="http://f43a933af7ac34dcec6f-e68f0ae55bed6d6f943b932cc8d70ccb.r3.cf1.rackcdn.com/461721da-e41c-47e4-a9bc-7701ab07da95-document%20folders%20screen%201.png" />

Click a folder name to drill into the folder and see the subfolders under it. You can see the "breadcrumbs" trail above your folders, which shows you which level you are at.

<img class="border" width="" src="http://f43a933af7ac34dcec6f-e68f0ae55bed6d6f943b932cc8d70ccb.r3.cf1.rackcdn.com/817ffd4f-2845-4798-b5e6-289806720415-document%20folders%20screen%202.png" />

Keep drilling in until you find your documents!
<img class="border" width="" src="http://f43a933af7ac34dcec6f-e68f0ae55bed6d6f943b932cc8d70ccb.r3.cf1.rackcdn.com/e691f573-f346-49af-bdc0-92b6bcc770c6-document%20folders%20screen%203.png" />

<h2>Adding a document and creating new folders</h2>
To add a document, go to your document folders. At the top you will see a link that says "Add Document". Click the link and enter your data in the fields. To create folders, type slashes "/" between the folder names in the Folder field.
When you enter folders and subfolders, these are created new if they do not exist.

<img class="border" width="500" src="http://f43a933af7ac34dcec6f-e68f0ae55bed6d6f943b932cc8d70ccb.r3.cf1.rackcdn.com/2bd56d1b-5a64-4f1a-9b19-3251f64d41d6-document%20folders%20screen%204.png" />

<h2>Adding documents to existing folders</h2>
To add documents to folders that already exist, <strong>navigate to the folder you want your document to go into and THEN</strong> click the "Upload Document" link.

<h2>Bulk folder creation</h2>
If you would like to bulk import folders or replicate your existing folder system, please <a href="http://www.qrimp.com/contact.html">contact us for a quote</a>.
Attachments
deleteedit39Brief Intro to Data Modeling<h2>What is a data model?</h2>
A data model is an organized overview of the data you need to keep track of, like a blueprint for your application. When you create a data model, you decide which "things" you want to store information about, and which information about those things is important.

<h2>Why model data?</h2>
Mapping out a data model before you start building your database will help you build a more efficient system. Data modeling is not required to build a Qrimp app.

<h2>Example</h2>
Let's say I have a grocery store. When I think about my information, I decide that I want to track the following "things":

- Employees
- Stock
- Suppliers

Information in a database is stored in tables. So in my database application, I will have three tables: Employees, Stock, and Suppliers. In each table, I enter further details about the things you want to keep track of.

In the grocery store example, I would create a <strong>table </strong>for each of these "things". I would also want to track certain information about each item, so I would add several columns in each table. For example, I would want to track my employees <strong>names</strong> and <strong>hire dates</strong>, so I'd add columns for those.

In a database, it's best to break down column names into the most detail possible. Rather than tracking "EmployeeName: Jane Doe" it's best to track "FirstName: Jane" and "LastName: Doe".

<strong>In other words...</strong>
What you have to do is think of the tables you'd like to create and decide which information you want to store. The tables will be the things we want to keep information about (ie: Books), and the columns will be specifics about that thing (ie: Author). Remember - Qrimp allows for [Adding Columns] if you think of something else you want to track later.

You create a table by navigating to Develop > Create Tables.

Once you have a basic set of data tables, you can manage your application by [Adding Columns] to existing tables and by creating more tables. You can also [Import Data] if you already have your information in spreadsheets or .csv files. Most applications, including Quickbooks, MS Outlook, banking websites and more allow for .csv export of data.

Here are some good links to help you get started with the concept of data modeling:

<a href="http://en.wikipedia.org/wiki/Table_(database)">Table (database)</a>
<a href="http://en.wikipedia.org/wiki/Relational_database">Relational Database</a>
<a href="http://en.wikipedia.org/wiki/Data_modeling">Data modeling (wiki)</a>
<a href="http://en.wikipedia.org/wiki/Database_normalization">Database normalization</a>
<a href="http://bytes.com/forum/thread585228.html">Database normalization discussion</a>.
An Introduction to Qrimp
deleteedit203HTML<h2>What is HTML?</h2>
HTML stands for Hyper Text Markup Language, it is how web pages are made. Knowledge of HTML will help you modify the way your Qrimp application is displayed, but is not required to use a Qrimp app.

<h2>Working with HTML</h2>
You can see the HTML for any web page by using the Developer Tools in your web browser. You can also right-click and select View Source or View Page Source.

You can use HTML in a Qrimp app when editing records, in the Header/Footer for records, in Views, and in Field Templates. You will need to make sure that your user group has permission to edit HTML (See [User Groups].

Here are some resources to help you learn HTML.
<a href="http://www.w3schools.com/html/">W3C Schools HTML Tutorial</a>
<a href="http://www.w3.org/MarkUp/Guide/">Dave Raggett's Getting Started with HTML</a>
<a href="http://www.echoecho.com/html.htm">EchoEcho.com's HTML Tutorial</a>
<a href="http://www.davesite.com/webstation/html/">Interactive Tutorial for Beginners</a>
Definitions
deleteedit133Computed Column<nobreak>
<h2>What is a Computed Column?</h2>
A Computed Column is a [datatype] that allows you to calculate mathematical equations using numerical data from other columns in your table, concatenate strings from other fields or add and subtract dates.

For example, if you had a Products table with columns for price and tax rate, you could calculate price + tax. Computed columns allow you to take full advantage of Microsoft SQL Server 2005 Transact-SQL functions. You can read more about T-SQL functions at the <a href="http://technet.microsoft.com/en-us/library/ms174318.aspx">MSDN Library</a>.

<h2>Adding a Computed Column</h2>
You can only add a computed column after a table has been created. Go to your table, then go to Develop > Table Management. Enter a new column name under Add a column, and select computed column as the datatype.

<h2>Examples</h2>
<h3>Calculations with Numbers</h3>
Formulas with numbers are the same as we learned in school. To calculate Profit in a table with a Unit Price and a List Price, we enter a new column called Profit and in the formula box, enter "UnitPrice-ListPrice".

<img class="border" src="/attachments/3b54339c-9f76-4f4c-b450-20a081b29b12/ComputedColumn1.png">

<h3>Column with Dates</h3>
In this example, we calculate the number of days between two dates in our table. For more information about formulas you can use on dates, see the <a href="http://technet.microsoft.com/en-us/library/ms186724.aspx">Date and Time Functions</a> entry.

<img class="border" src="/attachments/eea0d7ea-4344-4c01-941c-a0c31c54c028/NewComputedColumn.png">

<h3>Concatenating Fields</h3>
Concatenation is putting two strings together into one string. To add a concatenated field, use the + sign. To make a full name from a first and last name, enter a new column called FullName and in the formula box enter "Lastname + ', ' + Firstname".

<a href="http://technet.microsoft.com/en-us/library/ms181984.aspx">Click here to read more about T-SQL String Functions</a>.
</nobreak>
Adding Columns
deleteedit176Views<nobreak>
Views are ways of displaying data on the page. Qrimp can display data in a table, a photo gallery, XML, or a large number of other layouts. Views are also used to let you edit data or rearrange it on a page. Advanced developers can also use views as page templates to add new layouts using <a href="db.aspx?t=HelpTopics&id=203&vid=11">HTML</a> and Qrimp's [square brackets] notation.

Qrimp also has [Custom Views (Sorting and Filtering)]

<h2>Basic Views</h2>
Frequently used views are linked to by default in the [Content Header] with the following icons:<br/>
[Calendar View]  <img align=absmiddle src="icons/crystal_project/32x32/apps/cal.png"><br/>
[Tree View]  <img align=absmiddle src="icons/crystal_project/32x32/actions/view_tree.png" alt="Tree View"/> <br/>
[Grid View]  <img align=absmiddle src="icons/crystal_project/32x32/actions/view_text.png" alt="Grid View"/> (Also called list view or table view).<br/>
[Grid Edit]  <img align=absmiddle src="icons/crystal_project/32x32/apps/kate.png" alt="Grid Edit"/><br/>

Each Qrimp app comes with many default views.

<h2>Creating links to Views (for menu tabs and more)</h2>

In the location bar of your browser, you'll see the <a href="/db.aspx?t=HelpTopics&id=261&vid=11">url</a> you are on ie: "http://myapp.qrimp.com/db.aspx?t=customers&id=2&vid=11". The vid=11 tells the app to use view 11, which is the detail view. Changing the vid in your url will show you a different view. Note that if you are on a custom page or a page with a [clean url]) you will not see the vid. (See also [Query String Parameters])
Click the "Customers" tab to see the following screen, customers, displayed in Grid View (vid=1).

<img src="attachments/de08c23c-a1b5-4c0d-9972-4ff0c4668c17/ShipCustomer.jpg">

Try to open a table with the XML View, which has an id of 19. Go to a table and edit the query string in the URL so that "vid=19". Qrimp will apply the XML View to the data being returned on the page.

<img src="attachments/be8b1ffe-a495-41a4-8fba-a7ef3d8cad2f/XMLvIew.jpg">

<li>Here is a list of fields for a template and what they mean:
<h5>Name</h5>
<p>This is the name of the view for easy reference or for adding to the query string using the vid=name parameter. You can also use the ID of the view.
<h5>Description</h5>A description of your view
<h5>Displayid</h5>This tells Qrimp how to display the data, do you want your data in a table format like in the grid view or do you want it in a list. Most views you create will be a repeater. These controls are based on the ASP.NET <a href="http://msdn.microsoft.com/en-us/library/system.web.ui.webcontrols.repeater.aspx">Repeater Control</a> and the <a href="http://msdn.microsoft.com/en-us/library/system.web.ui.webcontrols.datagrid.aspx">DataGrid Control</a>.
<h5>Header</h5>The header content will appear above any data that is pulled from the database.
<h5>Footer</h5>The footer content will appear below any data that is pulled from the database.
<h5>ItemTemplate</h5>The item template is the HTML code that formats the display. If you are using a Repeater type view, then this HTML will format one complete record from the database. In a table type view, the item template will be applied to each column. In the table view, if there is no item template, then the template for the column is obtained from the [Field Templates].
<h5>CellTemplate</h5>In a repeater view, this should probably always be [DATA]. If you'd like to wrap the item template with an extra bit of HTML, you can add it here.
<h5>PageSize</h5>How many records to display by default. You can override this setting in the url using the &pagesize= parameter.
<h5>ContentType</h5>The content type tells the browser how to display the data. If blank, text/html is assumed. If you want to display xml, use text/xml.
<h5>EnableWiki</h5>If EnableWiki is true, square bracketed items will be hyperlinked.

<h2>Advanced: Building a New View</h2>
The easiest way to create your first View is to copy an existing view and then modify it. To copy a View, Go to Design > Views > Select the edit icon next to the View you want to copy > Scroll down to the bottom of the page > click the Copy button > Click the edit icon > edit the HTML > Save your edits with a new name.
</nobreak>
Display and Design
deleteedit69focuson Query String Parameter<nobreak><img src="/attachments/3ddae741-1e95-4629-8d44-879dbec2b8e1/focusonQueryString.png"><br/>

<p>When entering a url into the link section of a Menu tab, add a query string parameter called "focuson" with a value of the name of a field in your table to make the cursor appear in that field when the page loads.</p>

<h2>Example</h2>
<p>Your users would like to have the mouse cursor in the Name field when they load a Contacts form, so you add &focuson=name to the end of the query string on the menu that takes them there (see [Menus]).</p>
</nobreak>
Query String Parameters
deleteedit1300Add a User Group<span class="error"><em>Caution: If you add a user group, they will need permissions added manually to all tables and menus. They may also need permissions added to many [system tables] - portals (to see portals), queries, t_group_query, views etc. If any of this is done wrong, the user will not see things they should see.</em></span>

To add a new user group go to Admin > Manage Users.

Click the link on the top of the page that says "Manage Security Groups".

<img class="border" src="attachments/developer.qrimp.com-8b442862-ce60-4548-813d-75777ddc0543/managesecuritygroups.png" />

----

Click the "Add New" button to add a new security group.

To edit the settings for an existing security group, click the edit icon.

<img class="border" src="attachments/developer.qrimp.com-a46644f2-09a1-41a5-942e-3fd91e1c5d51/usergroupsettingeditusergrouporaddnew.png" />
User Groups
deleteedit1328Checkboxes<textarea>[checkbox:[DATA]:autoupdate]</textarea>

Only use autoupdate if you want editing to be enabled from the view.
Square Brackets
deleteedit225Messaging Module

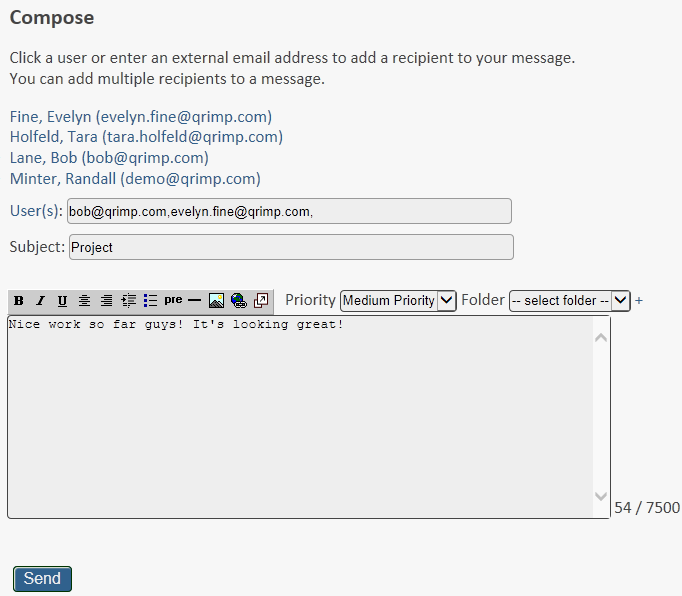
Select the user(s) to send the message to by clicking a username, or enter an email address into the users box. Messages sent to external recipients via email will not be logged in the Messages table by default.
Logging messages sent to external email addresses

To track messages sent to external email addresses go to Develop > Manage Tables. Select the Messages table and click "edit". Add a field called ToEmail with a data type of Email Address.

Creating Contacts Automatically

You can set up your Qrimp app to automatically create an entry in your Contacts table when you send an email to a new external contact. If you do not have a contacts table, create a table with at minimum the fields mentioned below. If you already have a Contacts table, go to Develop > Manage Tables, select Contacts > edit, and add the following columns:

Name - Single Line Text 100 Description - Multiline text 500 or greater Email - Email Address

Now when you send a message to an external email, the Name and Email fields will both show the email address. The description field will indicate that the contact was created from a message from within your Qrimp app. You can edit these fields later with more details.

Logging Contact Interactions

If you have or create an Interactions table, you can log interactions with existing contacts using the Qrimp messaging system. First, follow the instructions above for "Creating Contacts Automatically". Then add a table called Interactions, or add the following columns to your Interactions table:

Name - Single line Text 255 ContactId - Pick From Contacts InteractionDate - DateTime Description - Multiline Text 5000+

Click the check boxes for auditing and versioning.

Once you've built the contacts and interactions table, messages you send to external users from your Qrimp app will be logged. This data makes a great addition to a CRM and can be very useful on [Reports].

Messaging about items in your database tables

To use this feature, you must be comfortable with query string urls.

You can add the ability to see messages about an item in a table. First, add two additional fields to the messages table:

TableId - Pick From Table Settings ItemId - Number without Decimals
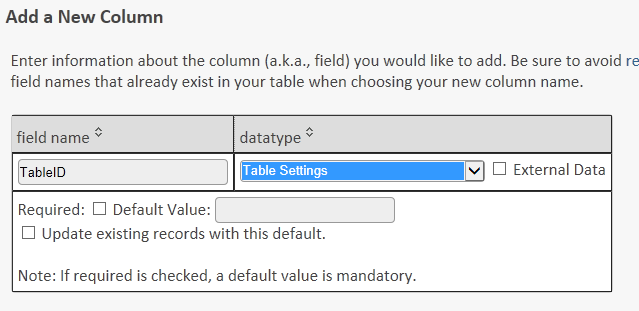
To send a message about a particular item, you must type in a url table that references the table you are mentioning. If you include a parameter to the tableid and itemid of an entity in your Qrimp App, the message will be created with the tableid and itemid specified. You can create the link like this: messages.aspx?t=messages&compose=new&tableid=1000&itemid=1

In this case, the message will be logged as being sent about item 1 in the table 1000.


<!--
This is being managed under the Communications section Messaging help topic and thus it is included here.

The messaging module includes an internal email-like
communication tool. It will let you send emails to users in your system. There are special features of the messaging system built in if your system is configured to enable these features.

<h2>Sending messages to other users of your Qrimp App</h2>
To Send an internal message, just click the link that says "Users" and pick the user to send the message to. The Qrimp Messaging system keeps track of the date the recipient read the message, which will help you communicate better by knowing if your messages are received.

<h2>Sending messages outside the system</h2>
The base messaging module will let you send emails outside the system by entering a remote email address into the users box. By default, the messages sent to external recipients via email address will not be logged in the Messages table. If you want these messages logged, you must add an additional field to your Messages table called "ToEmail" without the quotes and a data type of Email Address.

Below, we describe even more advanced ways to log emails sent externally.

<h2>Messaging about objects in your database</h2>

After you add the messages module, you may want to add two additional fields to the messages table that is created.

TableId = Pick From Table Settings
ItemId = Number without Decimals

If you link to the messages module and include a parameter to the tableid and itemid of an entity in your Qrimp App, the message will be created with the tableid and itemid specified. You can create the link like this:
messages.aspx?t=messages&compose=new&tableid=1000&itemid=1

In this case, the message will be logged as being sent in regards to the item with id of 1 in the table with id 1000.

<h2>Creating Contacts Automatically</h2>

If you'd like to send an email to someone outside your Qrimp App and simultaneously create a new contact in your Qrimp App for that recipient, you just need to add a Contacts table with the following fields:
Name - Single Line Text 100
Description - Multiline text 500 or greater
Email - Email Address

Then, whenever you send an email to a new email address, a contact for that person will be added to your database automatically. The Name and Email fields will both be set to the email address and the description will let you know the contact was created by sending a message from within the system.

<h2>Logging Contact Interactions</h2>

Like adding contact automatically, Qrimp can also log your interactions with those contacts through the internal messaging system. For this to work, your Qrimp App must have the Contacts table as described above plus an additional table called Interactions as described below. Be sure to create your table with the name "Interactions" without the quotes.

Fields Required on the Interactions Table:
Name - Single like Text 255 (Enough to accommodate the subject line)
ContactId - Pick From Contacts
InteractionDate - DateTime
Description - Multiline Text 5000+ (Enough to hold the message body)

You also click the check box for auditing so a createid and createdate field are added to the table.

Once you've built the contacts and interactions table, all messages you send from within your Qrimp App will be logged in these tables and you can write reports and integrate the messaging system into a larger CRM.


-->"> Install the messaging module to send messages in your Qrimp app. See [Adding Modules]

Sending Messages

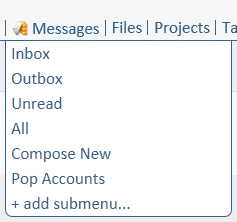
To send a message, go to Messages > Compose New.
Select the user(s) to send the message to by clicking a username, or enter an email address into the users box. Messages sent to external recipients via email will not be logged in the Messages table by default.

Logging messages sent to external email addresses

To track messages sent to external email addresses go to Develop > Manage Tables. Select the Messages table and click "edit". Add a field called ToEmail with a data type of Email Address.

Creating Contacts Automatically

You can set up your Qrimp app to automatically create an entry in your Contacts table when you send an email to a new external contact. If you do not have a contacts table, create a table with at minimum the fields mentioned below. If you already have a Contacts table, go to Develop > Manage Tables, select Contacts > edit, and add the following columns:

Name - Single Line Text 100 Description - Multiline text 500 or greater Email - Email Address

Now when you send a message to an external email, the Name and Email fields will both show the email address. The description field will indicate that the contact was created from a message from within your Qrimp app. You can edit these fields later with more details.

Logging Contact Interactions

If you have or create an Interactions table, you can log interactions with existing contacts using the Qrimp messaging system. First, follow the instructions above for "Creating Contacts Automatically". Then add a table called Interactions, or add the following columns to your Interactions table:

Name - Single line Text 255 ContactId - Pick From Contacts InteractionDate - DateTime Description - Multiline Text 5000+

Click the check boxes for auditing and versioning.

Once you've built the contacts and interactions table, messages you send to external users from your Qrimp app will be logged. This data makes a great addition to a CRM and can be very useful on [Reports].

Messaging about items in your database tables

To use this feature, you must be comfortable with query string urls.

You can add the ability to see messages about an item in a table. First, add two additional fields to the messages table:

TableId - Pick From Table Settings ItemId - Number without Decimals

To send a message about a particular item, you must type in a url table that references the table you are mentioning. If you include a parameter to the tableid and itemid of an entity in your Qrimp App, the message will be created with the tableid and itemid specified. You can create the link like this: messages.aspx?t=messages&compose=new&tableid=1000&itemid=1

In this case, the message will be logged as being sent about item 1 in the table 1000.


<!--
This is being managed under the Communications section Messaging help topic and thus it is included here.

The messaging module includes an internal email-like
communication tool. It will let you send emails to users in your system. There are special features of the messaging system built in if your system is configured to enable these features.

<h2>Sending messages to other users of your Qrimp App</h2>
To Send an internal message, just click the link that says "Users" and pick the user to send the message to. The Qrimp Messaging system keeps track of the date the recipient read the message, which will help you communicate better by knowing if your messages are received.

<h2>Sending messages outside the system</h2>
The base messaging module will let you send emails outside the system by entering a remote email address into the users box. By default, the messages sent to external recipients via email address will not be logged in the Messages table. If you want these messages logged, you must add an additional field to your Messages table called "ToEmail" without the quotes and a data type of Email Address.

Below, we describe even more advanced ways to log emails sent externally.

<h2>Messaging about objects in your database</h2>

After you add the messages module, you may want to add two additional fields to the messages table that is created.

TableId = Pick From Table Settings
ItemId = Number without Decimals

If you link to the messages module and include a parameter to the tableid and itemid of an entity in your Qrimp App, the message will be created with the tableid and itemid specified. You can create the link like this:
messages.aspx?t=messages&compose=new&tableid=1000&itemid=1

In this case, the message will be logged as being sent in regards to the item with id of 1 in the table with id 1000.

<h2>Creating Contacts Automatically</h2>

If you'd like to send an email to someone outside your Qrimp App and simultaneously create a new contact in your Qrimp App for that recipient, you just need to add a Contacts table with the following fields:
Name - Single Line Text 100
Description - Multiline text 500 or greater
Email - Email Address

Then, whenever you send an email to a new email address, a contact for that person will be added to your database automatically. The Name and Email fields will both be set to the email address and the description will let you know the contact was created by sending a message from within the system.

<h2>Logging Contact Interactions</h2>

Like adding contact automatically, Qrimp can also log your interactions with those contacts through the internal messaging system. For this to work, your Qrimp App must have the Contacts table as described above plus an additional table called Interactions as described below. Be sure to create your table with the name "Interactions" without the quotes.

Fields Required on the Interactions Table:
Name - Single like Text 255 (Enough to accommodate the subject line)
ContactId - Pick From Contacts
InteractionDate - DateTime
Description - Multiline Text 5000+ (Enough to hold the message body)

You also click the check box for auditing so a createid and createdate field are added to the table.

Once you've built the contacts and interactions table, all messages you send from within your Qrimp App will be logged in these tables and you can write reports and integrate the messaging system into a larger CRM.


-->
Modules
deleteedit230Adding Modules[Modules] are sets of [database table]s that add functionality instantly.

To add a module go to Develop > Add Module

Your module is added instantly. You may see new menus across the top that allow you to access the new tables. Sometimes you will not, for example, the "Countries" module simply adds the countries table to your list of tables. You can then use this as a look-up table (see [Look-up Tables]) in your other tables.
Modules
deleteedit1334Add a radio button[radios:yesno:[DATA]:autoupdate]Square Brackets
go to page: 1 2 3 4 5 6 7 8 9 10 243 records. Showing