Search the help documentation

Search:

Can't find what you are looking for? Use the Feedback tab in your app to submit an issue, or email support@ qrimp.com.


idnamedescriptionParentTopic
deleteedit116Menu Tabs Hide Action IconsIf you have too many tables and/or a narrow browser window, you may find that your menu tabs overlap the [Content header] area of your site, obstruction your view of the [Action Icons].

To resolve this issue, you can sometimes press Ctrl and the minus key (Ctrl-) to reduce the text size on the tabs and move them up.

We are working to resolve this issue.
Known Issues
deleteedit135Too much white space around elementsIf you edit text or [HTML] in [Headers and Footers] and [Field Templates] and other [System Tables], remove the spaces between your HTML tags before saving.

The description field of system tables automatically inserts a hard line break when you are entering text, so if you leave spaces between your HTML tags, you will notice extra spaces appearing once you have saved the item.
Known Issues
deleteedit1338Sorting in Grid EditYou cannot sort by the 'id' or 'name' column in [Grid Edit].Known Issues
deleteedit126Action IconsThese icons generally appear in the [Content Header], which is displayed at the top of your table below the [Menus].

<img src="attachments/16a4647b-af66-4cc7-8048-a4602798d624/ActionIcons.png">

<h2>Default Icons</h2>
When you build a new table in your Qrimp application, icons are created automatically based on the functionality that is possible within that table and according to the [User Groups] permissions. You can add or delete icons if you need more or less functionality. You can even create new actions by writing your own [operations] then choosing icons from the /icons/crystal_project/32x32 and putting them in the [Headers and Footers].

<h2>Editing Actions</h2>
Go to the table and view you want to change the actions for. Then go to Develop > Header/Footer. You will see the HTML for the icons. If nothing is listed, you will need to edit the default header / footer for your table, which is part of the [table definition].

The following are some default icons you will see in your Qrimp app.

<h2>Views Icons</h2>
These icons allow you to change the way you are viewing the data. To learn more, read about [Views].
<img src="/attachments/d8b7ffcf-fc7d-4ec9-ae46-a5428e455455/CalendarIcon.png"> [Calendar View]
<img align=absmiddle src="icons/crystal_project/32x32/actions/view_tree.png" alt="Tree View"/> [Tree View]
<img align=absmiddle src="icons/crystal_project/32x32/actions/view_text.png" alt="Grid View"/> [Grid View]
<img align=absmiddle src="/icons/crystal_project/32x32/mimetypes/spreadsheet_document.png" alt="Reports"/> [Reports]
<img align=absmiddle src=/icons/crystal_project/32x32/actions/next.png alt="Next Item"> Next Item - see [NextPrevious]
<img align=absmiddle src=/icons/crystal_project/32x32/actions/previous.png alt="Previous Item"> Previous Item - see [NextPrevious]

<h2>Data Editing Icons</h2>
Add records, edit or copy existing records, search and delete your data and more.
<img align=absmiddle src="icons/crystal_project/32x32/actions/edit_add.png" alt="Add New"/> Create View
<img align=absmiddle src="icons/crystal_project/32x32/actions/filefind.png" alt="Search"/> [Search]
<img align=absmiddle src="icons/crystal_project/32x32/apps/kmenuedit.png" alt="Edit Table Display"/> View [Headers and Footers]
<img align=absmiddle src="/icons/crystal_project/32x32/mimetypes/kivio_flw.png" alt="Design"/> [Design View]
<img align=absmiddle src="/icons/crystal_project/32x32/actions/cancel.png" alt="delete"> [Delete]
<img align=absmiddle src="/icons/crystal_project/32x32/actions/undo.png" alt="Cancel"> [Cancel]
<img align=absmiddle src="/icons/crystal_project/32x32/mimetypes/file_temporary.png"> [Versioning]

<h2>Advanced: Hiding Icon Labels in the [Content Header]</h2>
If you do not want to see the word that corresponds to the icon below the icon, you can change the stylesheet to #contentheader.label{display:none} or you can write a sql statement to remove them from all or selected tables. See [Stylesheets], [CSS] and [Using SQL Statements].
Content Header
deleteedit134NextPreviousThe next/previous arrow icons in the [Edit View] and [Detail View] of a record let you page through the items without changing your view.

<table><tr><td><a href="db.aspx?t=HelpTopics&id=1343&vid=11" title="Previous Help Topic"><img align=absmiddle class="noborder" src=/icons/crystal_project/32x32/actions/previous.png alt="Previous Help Topic"></a></td><td><a href="db.aspx?t=HelpTopics&id=3&vid=11" title="Next Help Topic"><img class="noborder" align=absmiddle src=/icons/crystal_project/32x32/actions/next.png alt="Next Help Topic"></a></td><tr><td> <a class="small" href="db.aspx?t=HelpTopics&id=1343&vid=11" title="Previous Help Topic">Previous</a></td><td><a class="small" href="db.aspx?t=HelpTopics&id=3&vid=11" title="Next Help Topic">Next</a></td></tr></table>
<span class="small">The next previous icons</span>

To add the next/previous icons to the top of your records go to the table you want to add them in, then go to Develop > Header/Footer.

Copy and paste the following [HTML] with [square brackets] into the Header field of your [Content Header]

<textarea><noeval><td><a href="db.aspx?t=HelpTopics&id=1343&vid=11" title="Previous Record"><img align=absmiddle class="noborder" src=/icons/crystal_project/32x32/actions/previous.png alt="Previous Record"></a></td><td><a href="db.aspx?t=HelpTopics&id=3&vid=11" title="Next Record"><img class="noborder" align=absmiddle src=/icons/crystal_project/32x32/actions/next.png alt="Next Record"></a></td><tr><td> <a class="small" href="db.aspx?t=HelpTopics&id=1343&vid=11" title="Previous Record">Previous</a></td><td><a class="small" href="db.aspx?t=HelpTopics&id=3&vid=11" title="Next Record">Next</a></td></noeval></textarea>

Note: HTML formatting must be not have line breaks.
<img alt="NextPrevious url code" src="/attachments/b4aa565f-0119-4030-8490-912e669e8ebc/Picture%206.png">
Content Header
deleteedit207Convert a Field to a Drop-DownTo convert a field to a drop-down (also known as pick-from or look-up table), first go to the table with the field you want to convert and go to Table Management.

<img class="border" src="/attachments/3f1407ef-0b8c-4d3a-bace-966c351ad865/Lookup1.jpg">

Beside the column you wish to convert, click the "Convert to Pick From List" link.

<img class="border" src="/attachments/622bbe93-f4ad-4e7d-b1ab-69b239a2fb7b/Lookup2.png">

You will get a warning pop-up asking you to confirm the change. Click okay. Once you have converted the field, you will notice a magnifying glass in your table management list and a link to the look-up table.

<img class="border" src="/attachments/f60ca418-8cdd-4f9b-8db2-4f5e4ea68c74/Lookup3.png">

As always when adding a new column, use the [form designer] to position the new field in your [Detail View]/[Edit View]/Add New View.
Creating a Look-up Table
deleteedit254Add a Drop-Down FieldFirst, make sure you have an appropriate table to use as a lookup table (see [Look-up Tables].)

Go to the table you want to add a drop down to, then go to [Table Management]. Click "Add a column"

In the "datatype" drop-down, select the database table you wish to add as a lookup table.

You may also wish to [Convert a Field to a Drop-Down].
Creating a Look-up Table
deleteedit264Hide Inactive Fields from Drop-DownsScenario: Bob is creating a new timesheet, and he's selecting a client from a drop-down. If some of your clients are no longer active, you do not want him to see them in this drop-down.

In this case, the first thing you will have to do is make sure your system has a way of knowing the client is no longer active. If you do not already have a field that tells you whether a client is active, you must [Add an Active/Inactive Field].

Then you will have to set the clients table to only show active clients when users are entering clients records from a drop-down field in another table.

<h2>Get the Table ID of the Clients Table</h2>
<a href="db.aspx?t=HelpTopics&id=1293&vid=11">Find the id of your Table</a> and write it down, copy it to your clipboard, or remember it. You will need to get the right table id number for this to work!

<img class="border" src="attachments/developer.qrimp.com-bdbc81bf-d9fd-42ec-a709-8404428a4f06/clientstableid.png" />
<span class="small">You can find the TableID from Table Management</span>

<h2>Write a SQL query</h2>
To hide an inactive record, you will need to use [SQL] security. Go to your Clients Table. Go to Table Management or Manage Tables. Click the link that says "Configure Table Settings" or "Settings".

Scroll down the Table Settings page to the field called "sqlsecurity". In that textbox, write the following statement, including all punctuation*:

<noeval>('1006'=1048 or Active = 'Y')</noeval>

<strong>Important: Change the id to match the id of your table!</strong>

<img class="border" src="attachments/developer.qrimp.com-ad7e285d-a7ed-4ec2-b5ed-33012a6d5aac/activeequalsy.PNG" />

Now, when Bob is creating a timesheet, he only sees active clients!

<img class="border" src="attachments/developer.qrimp.com-fd9d129a-a606-4b41-bfd4-0f58350af712/filteredclientlist.png" />

<h2>Important: Complete Data Entry is Key!</h2>
If you don't mark each client record as either active or inactive (and the field is empty) the record will be treated the same as if it were inactive. Be sure to mark all clients that you want in the list active!

* You could also write Active <> 'N'. The <> in a sql statement means 'not equal to'.
Creating a Look-up Table
deleteedit132Page LayoutsPage Layouts tell Qrimp how to display data. Page layouts come in two varieties: Grid and Repeater

<h3>Grid</h3>
Grid templates are similar to a spreadsheet or HTML table layout and are generally useful to show a lot of data in tables. In this display type, the cell template field applies to each row/column combination.

<h3>Repeater</h3>
Most all other templates will be the repeater type. In this display type, each record in the table is considered a cell. You can include values from each field in the row by using [square brackets] notation.
Creating your own views
deleteedit177Copying a ViewThe easiest way to get started with creating a custom View is to copy an existing one and then modify it to suit your needs.
To copy a View, follow the following steps:

1.In the Menu, navigate to Design > Views

<img src="attachments/0bbdd80e-5990-44c6-98d5-04968c44cfb2/DesignViewCopy.jpg">

2.In the Page Templates grid, select the edit icon (<img src="/attachments/e88589d8-11ab-415a-96db-2f99d5a3d4d6/EditIcon.png">) next to the View that is similar to the one you want to create.

<img src="attachments/2defb493-d6b6-4856-a12b-ef2c4ecbf989/ViewPageTemplates.jpg">

3.Scroll down to the bottom of the page and click the Copy button: <img src="attachments/a19ee9e7-e360-4d13-a410-8e0167ff4d63/CopyButton.jpg">


4.Now click the edit button --<img src="attachments/2f4e8ee1-f590-4494-b445-6d65237db30b/EditButton.jpg"> -- and begin creating your new custom View.
Creating your own views
deleteedit225Messaging Module

Select the user(s) to send the message to by clicking a username, or enter an email address into the users box. Messages sent to external recipients via email will not be logged in the Messages table by default.
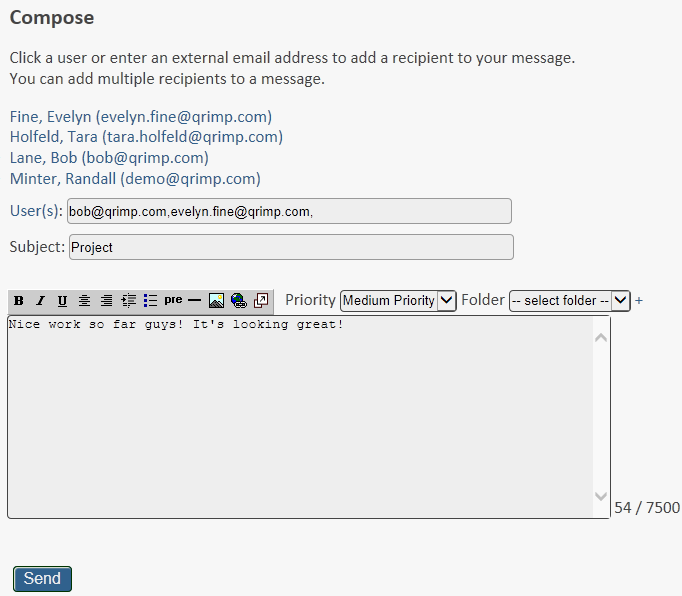
Logging messages sent to external email addresses

To track messages sent to external email addresses go to Develop > Manage Tables. Select the Messages table and click "edit". Add a field called ToEmail with a data type of Email Address.

Creating Contacts Automatically

You can set up your Qrimp app to automatically create an entry in your Contacts table when you send an email to a new external contact. If you do not have a contacts table, create a table with at minimum the fields mentioned below. If you already have a Contacts table, go to Develop > Manage Tables, select Contacts > edit, and add the following columns:

Name - Single Line Text 100 Description - Multiline text 500 or greater Email - Email Address

Now when you send a message to an external email, the Name and Email fields will both show the email address. The description field will indicate that the contact was created from a message from within your Qrimp app. You can edit these fields later with more details.

Logging Contact Interactions

If you have or create an Interactions table, you can log interactions with existing contacts using the Qrimp messaging system. First, follow the instructions above for "Creating Contacts Automatically". Then add a table called Interactions, or add the following columns to your Interactions table:

Name - Single line Text 255 ContactId - Pick From Contacts InteractionDate - DateTime Description - Multiline Text 5000+

Click the check boxes for auditing and versioning.

Once you've built the contacts and interactions table, messages you send to external users from your Qrimp app will be logged. This data makes a great addition to a CRM and can be very useful on [Reports].

Messaging about items in your database tables

To use this feature, you must be comfortable with query string urls.

You can add the ability to see messages about an item in a table. First, add two additional fields to the messages table:

TableId - Pick From Table Settings ItemId - Number without Decimals
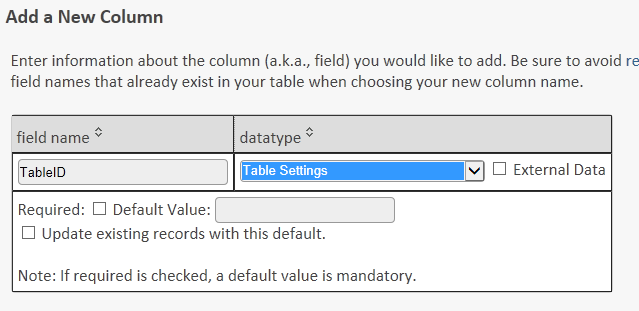
To send a message about a particular item, you must type in a url table that references the table you are mentioning. If you include a parameter to the tableid and itemid of an entity in your Qrimp App, the message will be created with the tableid and itemid specified. You can create the link like this: messages.aspx?t=messages&compose=new&tableid=1000&itemid=1

In this case, the message will be logged as being sent about item 1 in the table 1000.


<!--
This is being managed under the Communications section Messaging help topic and thus it is included here.

The messaging module includes an internal email-like
communication tool. It will let you send emails to users in your system. There are special features of the messaging system built in if your system is configured to enable these features.

<h2>Sending messages to other users of your Qrimp App</h2>
To Send an internal message, just click the link that says "Users" and pick the user to send the message to. The Qrimp Messaging system keeps track of the date the recipient read the message, which will help you communicate better by knowing if your messages are received.

<h2>Sending messages outside the system</h2>
The base messaging module will let you send emails outside the system by entering a remote email address into the users box. By default, the messages sent to external recipients via email address will not be logged in the Messages table. If you want these messages logged, you must add an additional field to your Messages table called "ToEmail" without the quotes and a data type of Email Address.

Below, we describe even more advanced ways to log emails sent externally.

<h2>Messaging about objects in your database</h2>

After you add the messages module, you may want to add two additional fields to the messages table that is created.

TableId = Pick From Table Settings
ItemId = Number without Decimals

If you link to the messages module and include a parameter to the tableid and itemid of an entity in your Qrimp App, the message will be created with the tableid and itemid specified. You can create the link like this:
messages.aspx?t=messages&compose=new&tableid=1000&itemid=1

In this case, the message will be logged as being sent in regards to the item with id of 1 in the table with id 1000.

<h2>Creating Contacts Automatically</h2>

If you'd like to send an email to someone outside your Qrimp App and simultaneously create a new contact in your Qrimp App for that recipient, you just need to add a Contacts table with the following fields:
Name - Single Line Text 100
Description - Multiline text 500 or greater
Email - Email Address

Then, whenever you send an email to a new email address, a contact for that person will be added to your database automatically. The Name and Email fields will both be set to the email address and the description will let you know the contact was created by sending a message from within the system.

<h2>Logging Contact Interactions</h2>

Like adding contact automatically, Qrimp can also log your interactions with those contacts through the internal messaging system. For this to work, your Qrimp App must have the Contacts table as described above plus an additional table called Interactions as described below. Be sure to create your table with the name "Interactions" without the quotes.

Fields Required on the Interactions Table:
Name - Single like Text 255 (Enough to accommodate the subject line)
ContactId - Pick From Contacts
InteractionDate - DateTime
Description - Multiline Text 5000+ (Enough to hold the message body)

You also click the check box for auditing so a createid and createdate field are added to the table.

Once you've built the contacts and interactions table, all messages you send from within your Qrimp App will be logged in these tables and you can write reports and integrate the messaging system into a larger CRM.


-->"> Install the messaging module to send messages in your Qrimp app. See [Adding Modules]

Sending Messages

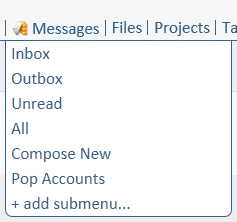
To send a message, go to Messages > Compose New.
Select the user(s) to send the message to by clicking a username, or enter an email address into the users box. Messages sent to external recipients via email will not be logged in the Messages table by default.

Logging messages sent to external email addresses

To track messages sent to external email addresses go to Develop > Manage Tables. Select the Messages table and click "edit". Add a field called ToEmail with a data type of Email Address.

Creating Contacts Automatically

You can set up your Qrimp app to automatically create an entry in your Contacts table when you send an email to a new external contact. If you do not have a contacts table, create a table with at minimum the fields mentioned below. If you already have a Contacts table, go to Develop > Manage Tables, select Contacts > edit, and add the following columns:

Name - Single Line Text 100 Description - Multiline text 500 or greater Email - Email Address

Now when you send a message to an external email, the Name and Email fields will both show the email address. The description field will indicate that the contact was created from a message from within your Qrimp app. You can edit these fields later with more details.

Logging Contact Interactions

If you have or create an Interactions table, you can log interactions with existing contacts using the Qrimp messaging system. First, follow the instructions above for "Creating Contacts Automatically". Then add a table called Interactions, or add the following columns to your Interactions table:

Name - Single line Text 255 ContactId - Pick From Contacts InteractionDate - DateTime Description - Multiline Text 5000+

Click the check boxes for auditing and versioning.

Once you've built the contacts and interactions table, messages you send to external users from your Qrimp app will be logged. This data makes a great addition to a CRM and can be very useful on [Reports].

Messaging about items in your database tables

To use this feature, you must be comfortable with query string urls.

You can add the ability to see messages about an item in a table. First, add two additional fields to the messages table:

TableId - Pick From Table Settings ItemId - Number without Decimals

To send a message about a particular item, you must type in a url table that references the table you are mentioning. If you include a parameter to the tableid and itemid of an entity in your Qrimp App, the message will be created with the tableid and itemid specified. You can create the link like this: messages.aspx?t=messages&compose=new&tableid=1000&itemid=1

In this case, the message will be logged as being sent about item 1 in the table 1000.


<!--
This is being managed under the Communications section Messaging help topic and thus it is included here.

The messaging module includes an internal email-like
communication tool. It will let you send emails to users in your system. There are special features of the messaging system built in if your system is configured to enable these features.

<h2>Sending messages to other users of your Qrimp App</h2>
To Send an internal message, just click the link that says "Users" and pick the user to send the message to. The Qrimp Messaging system keeps track of the date the recipient read the message, which will help you communicate better by knowing if your messages are received.

<h2>Sending messages outside the system</h2>
The base messaging module will let you send emails outside the system by entering a remote email address into the users box. By default, the messages sent to external recipients via email address will not be logged in the Messages table. If you want these messages logged, you must add an additional field to your Messages table called "ToEmail" without the quotes and a data type of Email Address.

Below, we describe even more advanced ways to log emails sent externally.

<h2>Messaging about objects in your database</h2>

After you add the messages module, you may want to add two additional fields to the messages table that is created.

TableId = Pick From Table Settings
ItemId = Number without Decimals

If you link to the messages module and include a parameter to the tableid and itemid of an entity in your Qrimp App, the message will be created with the tableid and itemid specified. You can create the link like this:
messages.aspx?t=messages&compose=new&tableid=1000&itemid=1

In this case, the message will be logged as being sent in regards to the item with id of 1 in the table with id 1000.

<h2>Creating Contacts Automatically</h2>

If you'd like to send an email to someone outside your Qrimp App and simultaneously create a new contact in your Qrimp App for that recipient, you just need to add a Contacts table with the following fields:
Name - Single Line Text 100
Description - Multiline text 500 or greater
Email - Email Address

Then, whenever you send an email to a new email address, a contact for that person will be added to your database automatically. The Name and Email fields will both be set to the email address and the description will let you know the contact was created by sending a message from within the system.

<h2>Logging Contact Interactions</h2>

Like adding contact automatically, Qrimp can also log your interactions with those contacts through the internal messaging system. For this to work, your Qrimp App must have the Contacts table as described above plus an additional table called Interactions as described below. Be sure to create your table with the name "Interactions" without the quotes.

Fields Required on the Interactions Table:
Name - Single like Text 255 (Enough to accommodate the subject line)
ContactId - Pick From Contacts
InteractionDate - DateTime
Description - Multiline Text 5000+ (Enough to hold the message body)

You also click the check box for auditing so a createid and createdate field are added to the table.

Once you've built the contacts and interactions table, all messages you send from within your Qrimp App will be logged in these tables and you can write reports and integrate the messaging system into a larger CRM.


-->
Modules
deleteedit230Adding Modules[Modules] are sets of [database table]s that add functionality instantly.

To add a module go to Develop > Add Module

Your module is added instantly. You may see new menus across the top that allow you to access the new tables. Sometimes you will not, for example, the "Countries" module simply adds the countries table to your list of tables. You can then use this as a look-up table (see [Look-up Tables]) in your other tables.
Modules
deleteedit1311PayPal Order IPN ModuleHelp Topic coming soon.Modules
deleteedit41PicklistsSee [Look-up Tables].Definitions
deleteedit42DatatypeA datatype is a type of data. Some data types include currency, decimals, text, date/time, yes/no and [look-up tables]. Choosing a datatype allows you increase data accuracy by restricting which kind of information users can enter when they are creating new records.

<h2>Data Accuracy</h2>
Choose a datatype that accurately describes which type of data a field will contain will make your application more efficient and less error-prone. It will also make any reports and charts you generate more precise. Think carefully about which datatype is most appropriate for your field. If you create a field called HireDate in your Employees table, choose the datatype date/time, users will only be able to enter properly formatted dates. If you chose a less specific datatype, such as Multi-line text, employees could enter the entire story of how they were hired in the HireDate field.
Definitions
deleteedit73Reserved WordsThe following is a list of special words that are used in the code and cannot be used as the name of a table or column.
<ul><span id=reservedwords></span></ul>
<script>
getContent("db.aspx?t=reservedwords&vid=15&pagesize=800&noheader=true&nofooter=true","reservedwords",true);
</script>
Definitions
deleteedit78Data TableRead more about <a href="http://en.wikipedia.org/wiki/Table_(database)">database tables</a> on wikipedia.Definitions
deleteedit99Look-up TablesLook-up tables are tables that are connected to other tables as drop-downs to make data entry easier. This is very convenient for oft-repeated data entry areas, such as country or say 'productcategory'. Enabling users to select data from a drop is great for data integrity, increasing accuracy and reducing spelling errors.

In this example, FurColor is a look-up table:

<b>TeddyBears</b>
Name: Fuzzy
Nickname:<input type=text size =20 id=name name=name maxlength=50 >
FurColor: <select name="datatype0"><option value='pickfrom_accounttypes'>Brown</option><option value='pickfrom_t_furcolor'>White</option><option value='pickfrom_t_users'>Blue</option><option value='pickfrom_t_views'>Black</option><option value='pickfrom_yesno'>Beige</option></select>

I could only have this drop-down if I already have a FurColor table in my application.

See also [Creating a Look-Up Table], [Adding a Drop-Down Field], and [Convert a Field to a Drop-Down].
Definitions
deleteedit148Iterative DevelopmentIterative Development is a development methodology that is based on building a project quickly, in a series of short development cycles that allow for frequent feedback between the developer and the purchaser/end user/testers of the system.

Iterative development can reduce development time as it allows the changes that the user requests to be implemented sooner in the development process, reducing the amount of work that has to be done or undone.

There is a fairly comprehensive <a href="http://en.wikipedia.org/wiki/Iterative_development">article on iterative development</a> at wikipedia.
Definitions
deleteedit150IconsIcons are used throughout Qrimp applications as visual cues. You can use icons anywhere in your application for any reason.

<img class="border" width="500px" src="/attachments/developer.qrimp.com-2779e58c-5d00-47c6-aaf0-1aac672f08f1/pageoficons.png" />
<span class="small">Qrimp has a large selection of icons to choose from</span>

<h2>Using Icons in your HTML</h2>

To view all of the icons, go to Design > Icons/Icons List

Click the icon you wish to use.

Copy the filepath from the iconurl field and paste it into the "source" (<a href="db.aspx?t=helptopics&id=261&vid=11">url</a>) of your img tag (src=).

Pull the image from the icons folder using a relative url, like this:
<textarea>
<img src="/icons/crystal_project/32x32/actions/edit_add.png">

This will pull in the icon, like so: <img src="/icons/crystal_project/32x32/actions/edit_add.png"> or so <img src="/icons/crystal_project/16x16/actions/edit_add.png"></textarea>

See also: <a href="db.aspx?t=helptopics&id=70&vid=11">Icontheme</a>
[Action Icons]
Definitions
deleteedit175CRUDIn every Qrimp app, there are five default [operations] that users can perform on a database: Create, Read, Update, Delete and Admin. To allow your users to perform these operations, give them the permission to do so using [Table Security].

You can create as many levels of access as you like. Add, remove, or adjust the configuration of existing operations to fine tune the capabilities your users have within your Qrimp Application.

Learn more about CRUD by searching the web.
Definitions
deleteedit203HTML<h2>What is HTML?</h2>
HTML stands for Hyper Text Markup Language, it is how web pages are made. Knowledge of HTML will help you modify the way your Qrimp application is displayed, but is not required to use a Qrimp app.

<h2>Working with HTML</h2>
You can see the HTML for any web page by using the Developer Tools in your web browser. You can also right-click and select View Source or View Page Source.

You can use HTML in a Qrimp app when editing records, in the Header/Footer for records, in Views, and in Field Templates. You will need to make sure that your user group has permission to edit HTML (See [User Groups].

Here are some resources to help you learn HTML.
<a href="http://www.w3schools.com/html/">W3C Schools HTML Tutorial</a>
<a href="http://www.w3.org/MarkUp/Guide/">Dave Raggett's Getting Started with HTML</a>
<a href="http://www.echoecho.com/html.htm">EchoEcho.com's HTML Tutorial</a>
<a href="http://www.davesite.com/webstation/html/">Interactive Tutorial for Beginners</a>
Definitions
deleteedit252Database tableA database table is the master sheet of data in a particular area. It is best to create a new database table for each separate type of thing ie: Contacts, Contact Type, Employees, Inventory, Tasks, Invoices, etc. See also [Introduction to Tables].

To see all of your database tables go to Develop > Manage Tables. (See also: [Manage Tables])

Database tables can be linked together with relationships. For example, one employee may be related to many tasks. This would be a 'many-to-many' relationship. See [Many-to-Many].
Definitions
deleteedit261urlA url (uniform resource locator) is the string of words and symbols that makes an address on the internet.

<img class="border" src="attachments/developer.qrimp.com-69a2f894-65ef-4795-bcdc-064b54a403e9/url.png" />
<span class="small">A url</span>

If you type in www.qrimp.com into the [location bar] of your [web browser], you have just written a url.

Links on websites are also urls.

A url usually has two parts. A file path leads to a location on the internet, like a website, and [query strings] contain parameters that specify which data from a site or database to pull back into your browser for display. Query strings are used when a website communicates with a database - the information in the query string tells the database which data to pull in to the web browser.
Definitions
deleteedit262location barThe location bar or address bar is the part of your [web browser] where you type in a website address on the internet. Most browsers will also let you enter a search query.Definitions
go to page: 1 2 3 4 5 6 7 8 9 10 243 records. Showing