Tree View
Tree
List View
Alphabetical List
Share
Share
Search:
id:
253

name:

Detail View


description:
Detail view shows you one individual record in a table at a time.

If you go to the detail view of a record, you can see related data, attachments and more on the right hand side of the table.

The view id for the view is 11.


ParentTopic:
 

id:
254

name:

Add a Drop-Down Field


description:
First, make sure you have an appropriate table to use as a lookup table (see Look-up Tables.)

Go to the table you want to add a drop down to, then go to Table Management. Click "Add a column"

In the "datatype" drop-down, select the database table you wish to add as a lookup table.

You may also wish to Convert a Field to a Drop-Down.


ParentTopic:
 

id:
255

name:

Portal Subscriptions


description:
One way to add Portals to your Dashboard is to subscribe to them.

Hover over the Dashboard menu tab, then click the sub-menu for 'Portal Subscriptions'. (Note: If you cannot see Portal Subscriptions, please contact your site Administrator to get permission to the menu).


Click the checkboxes next to the portals that are of interest to you, then click save. If your user group does not have permission to see that area of the site, the portal window will be blank, and you should delete it.


ParentTopic:
 

id:
256

name:

Adding a Calendar List Portal


description:
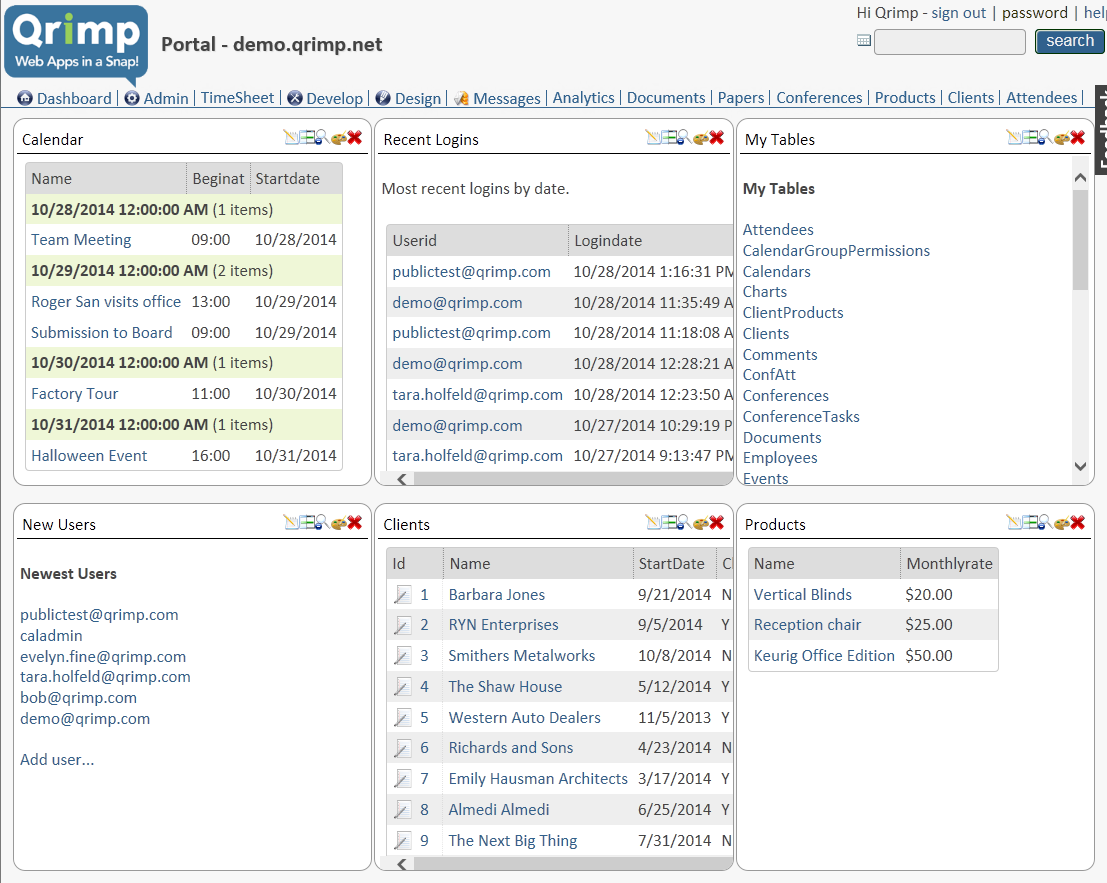
A list of upcoming events on your Dashboard can help you see what you need to do this week. You will need to have the Calendar and Custom Views modules installed (see: Modules).


Adding a Calendar List


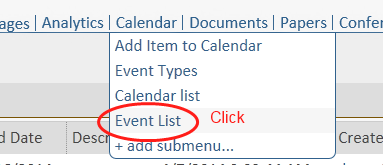
In your menus, go to > Calendar > Event List


-------

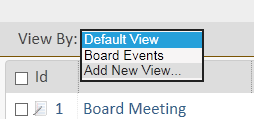
You will see a list of all events. You need to filter this using custom views, so that you see only today's and future events. You must have the custom views module installed.


-------

At the top of the list, click "Add New View".


-------
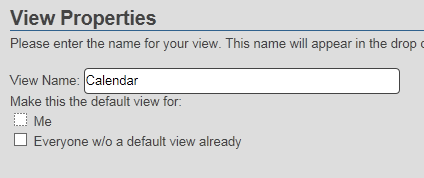
Enter a name for your view. "Calendar" will be fine. Don't select it as the default view.


-------
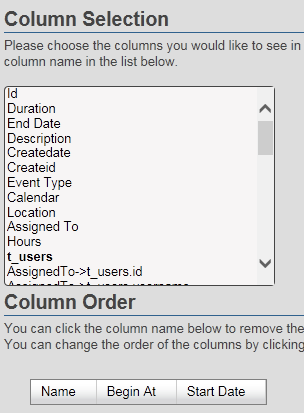
Select the "Name", "BeginAt" and "StartDate" columns from the list.
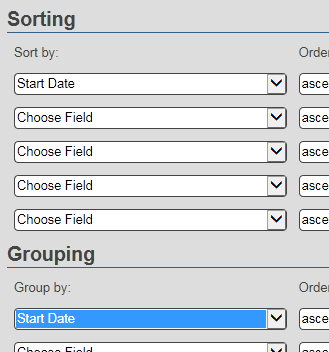

-------
Sort by Start Date.

Group by Start Date.


-------
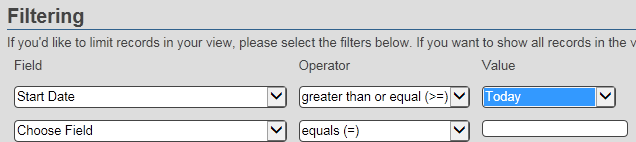
Filter the view. Select "Start Date", "greater than or equal to" and "Today".


-------
Select the user groups and users who should be allowed to see this view. There is nothing private in our calendar so we make it available to every user group except anonymous. Note: this will not add the portal for those users or groups. Users can add a portal using Portal Subscriptions.
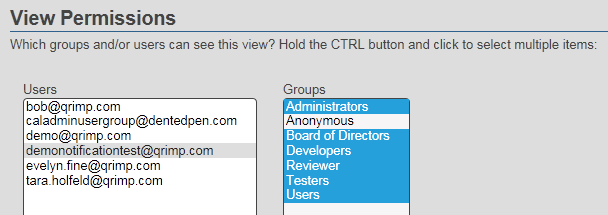
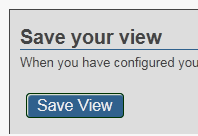

-------
Save your view.


-------
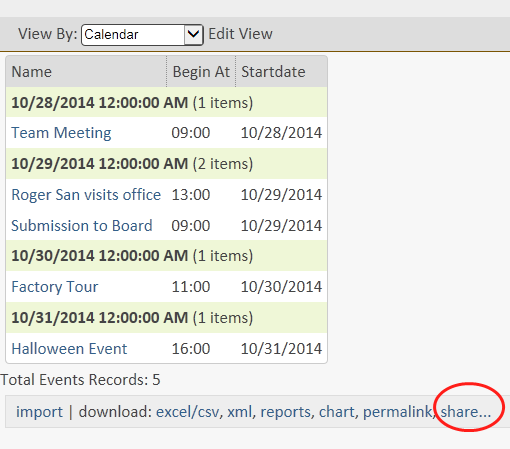
You will see your new view. At the bottom is a link to share it. Click the share link.


-------
You will see a link to add to Dashboard. Click the "Add to Dashboard" link.


-------
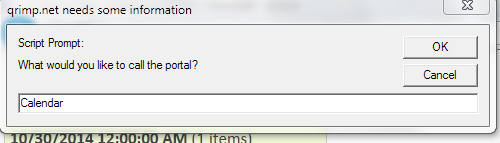
Name your new calendar view. "Calendar" is a good name.


-------
Click the "View Your Dashboard Now" link.


-------
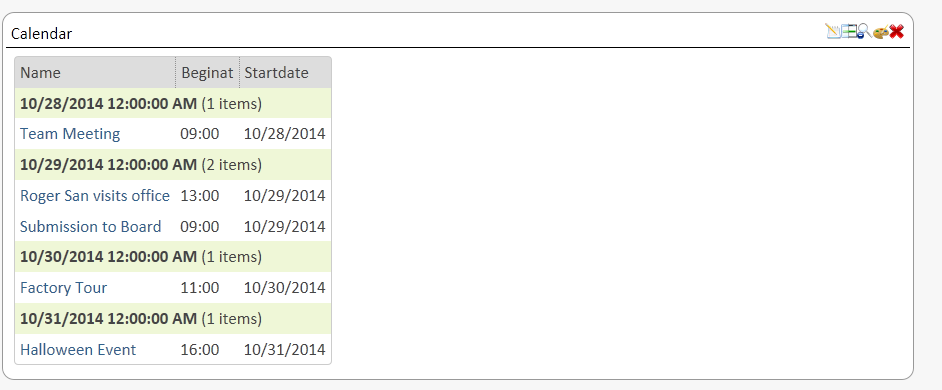
Your calendar is now a portal window on your dashboard.


-------


ParentTopic:
 

id:
259

name:

Grid Edit


description:
Grid edit is a view that makes data entry faster.

You also use the Grid Edit view to re-order columns in your database table. See reordering columns.

In grid edit, you look at multiple rows in your table, and you can click each field to edit it from the table, without going into each record.

To get to grid edit, go to the table you want to edit and select the "Grid Edit" sub-menu tab.


--------
Click the field you want to edit. Edit your data. Click save when you are finished.


Advanced: Grid Edit Query String


Enter &_showeditgrid=true" in your query string to get a grid view for any table. (See query strings).


ParentTopic:
 

id:
260

name:

Query Strings


description:
A query string is part of a url. The query string is one of Qrimp's most powerful customization tools. We encourage you to take some time to experiment with query strings.


The query string that pulls back the current record from the help topics table

In general, a query string will allow you to specify the source of your data (the table) and select which data from that table to display. You can also use a query string to format and filter your data. You can even limit which data within a particular record you would like to display.

A query string contains query string parameters that identify which data to pull back and how to display it.

The rules of Internet URL Query String Syntax specify that the first parameter after the .aspx should be a ?. All subsequent parameters should be prefixed with an &.


ParentTopic:
 

id:
261

name:

url


description:
A url (uniform resource locator) is the string of words and symbols that makes an address on the internet.


A url

If you type in www.qrimp.com into the location bar of your web browser, you have just written a url.

Links on websites are also urls.

A url usually has two parts. A file path leads to a location on the internet, like a website, and query strings contain parameters that specify which data from a site or database to pull back into your browser for display. Query strings are used when a website communicates with a database - the information in the query string tells the database which data to pull in to the web browser.


ParentTopic:
 

id:
262

name:

location bar


description:
The location bar or address bar is the part of your web browser where you type in a website address on the internet. Most browsers will also let you enter a search query.


ParentTopic:
 

id:
263

name:

web browser


description:
A program used to browse the internet. Common web browsers are Chrome, IE, Firefox, Safari and Opera.


Some web browser icons

Many smart phones have built-in web browsers.


ParentTopic:
 

id:
264

name:

Hide Inactive Fields from Drop-Downs


description:
Scenario: Bob is creating a new timesheet, and he's selecting a client from a drop-down. If some of your clients are no longer active, you do not want him to see them in this drop-down.

In this case, the first thing you will have to do is make sure your system has a way of knowing the client is no longer active. If you do not already have a field that tells you whether a client is active, you must Add an Active/Inactive Field.

Then you will have to set the clients table to only show active clients when users are entering clients records from a drop-down field in another table.

Get the Table ID of the Clients Table


Find the id of your Table and write it down, copy it to your clipboard, or remember it. You will need to get the right table id number for this to work!


You can find the TableID from Table Management

Write a SQL query


To hide an inactive record, you will need to use SQL security. Go to your Clients Table. Go to Table Management or Manage Tables. Click the link that says "Configure Table Settings" or "Settings".

Scroll down the Table Settings page to the field called "sqlsecurity". In that textbox, write the following statement, including all punctuation*:

('[_TABLEID]'=1048 or Active = 'Y')

Important: Change the id to match the id of your table!


Now, when Bob is creating a timesheet, he only sees active clients!


Important: Complete Data Entry is Key!


If you don't mark each client record as either active or inactive (and the field is empty) the record will be treated the same as if it were inactive. Be sure to mark all clients that you want in the list active!

* You could also write Active <> 'N'. The <> in a sql statement means 'not equal to'.


ParentTopic:
 

id:
265

name:

Changing a Datatype


description:
To change the datatype for a field, go to your table, then to Develop > Table Management.

Choose the field that you want to change and click 'change datatype'.


In the dialog box, select a new datatype from the drop-down list.


Before you Convert


Make sure your data is clean. Use the grid edit view and sort by the column you wish to convert to a drop-down.

You would not want to change this data to a drop-down:

Category:
Restaurant
Gas Station
Reeatruant
Restaurant
Grocery Store
Diner
Grocery STrore
Gas Station
Restaurant
GroceryStore

If you converted data like that, every time someone was picking from the drop-down they would see all the misspellings!

So take the time to correct them first.


ParentTopic:
 

id:
1264

name:

drop-down


description:
A drop-down list box is also known as a select list, look-up table or a pick-from list.

When you are adding records, drop-down lists increase data accuracy by letting you select data from a list rather than type it in. Drop-down are particularly useful for oft-repeated data entry fields, like "Country" "Status" or "Category".

Drop-downs are also used to connect a record to an item in a related table. For example, if you were entering a new Project, the drop-down for the "Manager" field, would be a list of Employees.

Sample Drop-down


See also:
Look-up Tables
Convert a Field to A Drop-Down
Add a Drop-Down Field
Hide Inactive Fields from Drop-Downs


ParentTopic:
 

id:
1265

name:

AutomaticIDs


description:
Qrimp automatically assigns every table and every record in every table an id number. This number is used by the system to identify those tables and records. IDs are created sequentially and start at 1 for the records in a table.

By default, you will see the id for a record in the grid view for a table. Click the id number to go to the detail view for that record.


The default link or url for each record will also show the id. You can find this in the location bar of your browser. The url for customer with an id of 238 will look like this:

http://myapp.qrimp.net/db.aspx?t=customers&vid=11&id=238

The customer with an id of 238 is the 238th customer that was added to your system. If a record is deleted, the id numbers in that table will become non-sequential.


ParentTopic:
 

id:
1266

name:

Hide All Access to a table


description:
Besides deleting a table, the best way to make sure that nobody sees it again is to use Table Security to make it so that all user groups have no CRUD permissions on the table.

Follow the instructions in Table Security but turn off all permissions, like this:


ParentTopic:
 

id:
1267

name:

Deleting a Table


description:
Go to Develop > Manage Tables

Find your table and click the delete link:


You will be prompted to make sure you really want to delete the table:


Deleting a table is final! If you are sure you won't ever need any of the data in this table again at any point in the future, go ahead and click yes.

If your table had relationships, you will be warned about those connections so that you do not have orphaned records.


ParentTopic:
 

id:
1268

name:

Add an Active/Inactive Field


description:

Creating an Active (y/n) Field on an Existing Table


You may want to mark certain fields inactive. For example, you may have clients that you no longer work with.

Go to the Clients table > click the Table Management sub-menu, or go to table management, find your table in the list and click edit. Add a column called "Active" and make the datatype a yes/no. Click "Add Column". (See Adding Columns).


Use the Form Designer to arrange the new field.


Update your clients and mark them Active yes or no. Grid Edit makes this faster.


You may also wish to Hide Inactive Fields from Drop-Downs


ParentTopic:
 

id:
1269

name:

Managing Users


description:
To manage users and user groups go to Admin > Manage Users.


ParentTopic:
 

id:
1270

name:

Deleting a User


description:
To delete a user, go to Admin > Manage Users.

Click the name of the user you want to delete:


In the ContentHeader, click the red X delete button:


If the user has created records, or has permissions associated with their account, you will either need to delete or reassign those records:


ParentTopic:
 

id:
1272

name:

Marking a User Inactive (Not Enabled)


description:
If you want to not let someone use your system anymore, but you want to keep the historical data associated with them, you can mark them inactive. This can be more convenient than deleting a user because a) you get to keep all of their data and b) you don't have to reassign all of their data.

Do make a user inactive go to Admin > Manage Users. Then click the users name.

Change the radio button enabled to 'no'.


ParentTopic:
 

id:
1273

name:

Adding Attachments


description:
Attachments are added to individual records in your Qrimp tables.

There are two ways to add attachments:

With the paperclip icon in the header/footer


Using the Add link in the Attachments box


ParentTopic:
 

go to page: 1 2 3 4 5 6 7 8 9 10 11 12 13 243 records. Showing