Search the help documentation

Search:

Can't find what you are looking for? Use the Feedback tab in your app to submit an issue, or email support@ qrimp.com.


idnamedescriptionParentTopic
deleteedit1264drop-downA drop-down list box is also known as a select list, look-up table or a pick-from list.

When you are adding records, drop-down lists increase data accuracy by letting you select data from a list rather than type it in. Drop-down are particularly useful for oft-repeated data entry fields, like "Country" "Status" or "Category".

Drop-downs are also used to connect a record to an item in a related table. For example, if you were entering a new Project, the drop-down for the "Manager" field, would be a list of Employees.

<h2>Sample Drop-down</h2>

<select name="datatype0"><option value='decimal(18, 2)'>Number with decimals</option><option value='int'>Number without decimals</option><option value='datetime'>Date/Time</option><option value='varchar (2)'>Text (2 characters)</option><option value='varchar (50)'>Text (50 characters)</option><option value=''>-- picklist from --</option><option value='pickfrom_accounttypes'>accounttypes</option><option value='pickfrom_t_furcolor'>furcolor</option><option value='pickfrom_t_users'>t_users</option><option value='pickfrom_t_views'>t_views</option><option value='pickfrom_yesno'>yesno</option></select>

See also:
[Look-up Tables]
[Convert a Field to A Drop-Down]
[Add a Drop-Down Field]
[Hide Inactive Fields from Drop-Downs]
Definitions
deleteedit1275CSSCSS stands for Cascading Style Sheets. This is the code that determines the colors and positions of elements in your web app.Definitions
deleteedit1285JavaScriptJavaScript is a type of code that is used with <a href="http://developer.qrimp.com/HelpTopics/HTML">to make the </a> elements of a page interactive.Definitions
deleteedit1292Radio ButtonA radio button is an interface input to a [datatype] that has two options. It shows up as two small circles. When one option is selected, a dot appears in the selected circle.

<label class="datalabel move" for="Canceled">Canceled:</label>
<span class="radiobtn" style="white-space: nowrap;"><input name="Canceled" tabindex="8" id="CanceledN" type="radio" value="N"><label for="CanceledN">No </label></span><span class="radiobtn" style="white-space: nowrap;"><input name="Canceled" tabindex="7" id="CanceledY" type="radio" value="Y"><label for="CanceledY">Yes </label></span>

You can enter radios into [field templates] using [square brackets].

[radios:yesno:[DATA]:autoupdate]
Definitions
deleteedit1330CachingCaching is a way that data from your website is stored temporarily in your browser to make your browsing experience faster. Caching is very common on the internet. Stored data is kept in your browser's cache, and can be cleared from your browser. Qrimp makes use of caching.

<a href="http://en.wikipedia.org/wiki/Web_cache">Wikipedia article on caching</a>
Definitions
deleteedit225Messaging Module

Select the user(s) to send the message to by clicking a username, or enter an email address into the users box. Messages sent to external recipients via email will not be logged in the Messages table by default.
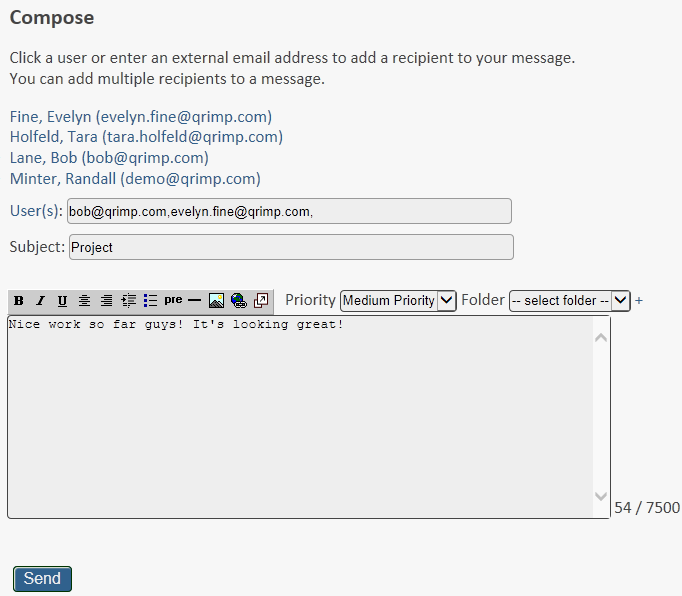
Logging messages sent to external email addresses

To track messages sent to external email addresses go to Develop > Manage Tables. Select the Messages table and click "edit". Add a field called ToEmail with a data type of Email Address.

Creating Contacts Automatically

You can set up your Qrimp app to automatically create an entry in your Contacts table when you send an email to a new external contact. If you do not have a contacts table, create a table with at minimum the fields mentioned below. If you already have a Contacts table, go to Develop > Manage Tables, select Contacts > edit, and add the following columns:

Name - Single Line Text 100 Description - Multiline text 500 or greater Email - Email Address

Now when you send a message to an external email, the Name and Email fields will both show the email address. The description field will indicate that the contact was created from a message from within your Qrimp app. You can edit these fields later with more details.

Logging Contact Interactions

If you have or create an Interactions table, you can log interactions with existing contacts using the Qrimp messaging system. First, follow the instructions above for "Creating Contacts Automatically". Then add a table called Interactions, or add the following columns to your Interactions table:

Name - Single line Text 255 ContactId - Pick From Contacts InteractionDate - DateTime Description - Multiline Text 5000+

Click the check boxes for auditing and versioning.

Once you've built the contacts and interactions table, messages you send to external users from your Qrimp app will be logged. This data makes a great addition to a CRM and can be very useful on [Reports].

Messaging about items in your database tables

To use this feature, you must be comfortable with query string urls.

You can add the ability to see messages about an item in a table. First, add two additional fields to the messages table:

TableId - Pick From Table Settings ItemId - Number without Decimals
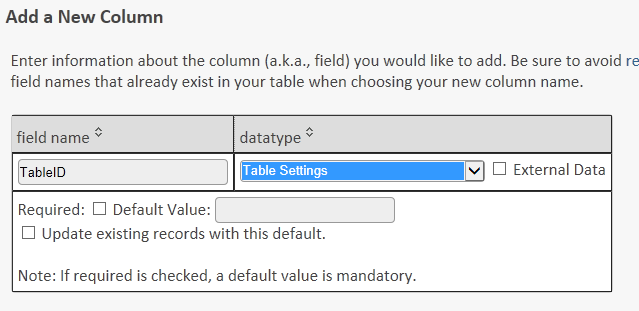
To send a message about a particular item, you must type in a url table that references the table you are mentioning. If you include a parameter to the tableid and itemid of an entity in your Qrimp App, the message will be created with the tableid and itemid specified. You can create the link like this: messages.aspx?t=messages&compose=new&tableid=1000&itemid=1

In this case, the message will be logged as being sent about item 1 in the table 1000.


<!--
This is being managed under the Communications section Messaging help topic and thus it is included here.

The messaging module includes an internal email-like
communication tool. It will let you send emails to users in your system. There are special features of the messaging system built in if your system is configured to enable these features.

<h2>Sending messages to other users of your Qrimp App</h2>
To Send an internal message, just click the link that says "Users" and pick the user to send the message to. The Qrimp Messaging system keeps track of the date the recipient read the message, which will help you communicate better by knowing if your messages are received.

<h2>Sending messages outside the system</h2>
The base messaging module will let you send emails outside the system by entering a remote email address into the users box. By default, the messages sent to external recipients via email address will not be logged in the Messages table. If you want these messages logged, you must add an additional field to your Messages table called "ToEmail" without the quotes and a data type of Email Address.

Below, we describe even more advanced ways to log emails sent externally.

<h2>Messaging about objects in your database</h2>

After you add the messages module, you may want to add two additional fields to the messages table that is created.

TableId = Pick From Table Settings
ItemId = Number without Decimals

If you link to the messages module and include a parameter to the tableid and itemid of an entity in your Qrimp App, the message will be created with the tableid and itemid specified. You can create the link like this:
messages.aspx?t=messages&compose=new&tableid=1000&itemid=1

In this case, the message will be logged as being sent in regards to the item with id of 1 in the table with id 1000.

<h2>Creating Contacts Automatically</h2>

If you'd like to send an email to someone outside your Qrimp App and simultaneously create a new contact in your Qrimp App for that recipient, you just need to add a Contacts table with the following fields:
Name - Single Line Text 100
Description - Multiline text 500 or greater
Email - Email Address

Then, whenever you send an email to a new email address, a contact for that person will be added to your database automatically. The Name and Email fields will both be set to the email address and the description will let you know the contact was created by sending a message from within the system.

<h2>Logging Contact Interactions</h2>

Like adding contact automatically, Qrimp can also log your interactions with those contacts through the internal messaging system. For this to work, your Qrimp App must have the Contacts table as described above plus an additional table called Interactions as described below. Be sure to create your table with the name "Interactions" without the quotes.

Fields Required on the Interactions Table:
Name - Single like Text 255 (Enough to accommodate the subject line)
ContactId - Pick From Contacts
InteractionDate - DateTime
Description - Multiline Text 5000+ (Enough to hold the message body)

You also click the check box for auditing so a createid and createdate field are added to the table.

Once you've built the contacts and interactions table, all messages you send from within your Qrimp App will be logged in these tables and you can write reports and integrate the messaging system into a larger CRM.


-->"> Install the messaging module to send messages in your Qrimp app. See [Adding Modules]

Sending Messages

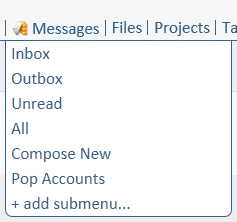
To send a message, go to Messages > Compose New.
Select the user(s) to send the message to by clicking a username, or enter an email address into the users box. Messages sent to external recipients via email will not be logged in the Messages table by default.

Logging messages sent to external email addresses

To track messages sent to external email addresses go to Develop > Manage Tables. Select the Messages table and click "edit". Add a field called ToEmail with a data type of Email Address.

Creating Contacts Automatically

You can set up your Qrimp app to automatically create an entry in your Contacts table when you send an email to a new external contact. If you do not have a contacts table, create a table with at minimum the fields mentioned below. If you already have a Contacts table, go to Develop > Manage Tables, select Contacts > edit, and add the following columns:

Name - Single Line Text 100 Description - Multiline text 500 or greater Email - Email Address

Now when you send a message to an external email, the Name and Email fields will both show the email address. The description field will indicate that the contact was created from a message from within your Qrimp app. You can edit these fields later with more details.

Logging Contact Interactions

If you have or create an Interactions table, you can log interactions with existing contacts using the Qrimp messaging system. First, follow the instructions above for "Creating Contacts Automatically". Then add a table called Interactions, or add the following columns to your Interactions table:

Name - Single line Text 255 ContactId - Pick From Contacts InteractionDate - DateTime Description - Multiline Text 5000+

Click the check boxes for auditing and versioning.

Once you've built the contacts and interactions table, messages you send to external users from your Qrimp app will be logged. This data makes a great addition to a CRM and can be very useful on [Reports].

Messaging about items in your database tables

To use this feature, you must be comfortable with query string urls.

You can add the ability to see messages about an item in a table. First, add two additional fields to the messages table:

TableId - Pick From Table Settings ItemId - Number without Decimals

To send a message about a particular item, you must type in a url table that references the table you are mentioning. If you include a parameter to the tableid and itemid of an entity in your Qrimp App, the message will be created with the tableid and itemid specified. You can create the link like this: messages.aspx?t=messages&compose=new&tableid=1000&itemid=1

In this case, the message will be logged as being sent about item 1 in the table 1000.


<!--
This is being managed under the Communications section Messaging help topic and thus it is included here.

The messaging module includes an internal email-like
communication tool. It will let you send emails to users in your system. There are special features of the messaging system built in if your system is configured to enable these features.

<h2>Sending messages to other users of your Qrimp App</h2>
To Send an internal message, just click the link that says "Users" and pick the user to send the message to. The Qrimp Messaging system keeps track of the date the recipient read the message, which will help you communicate better by knowing if your messages are received.

<h2>Sending messages outside the system</h2>
The base messaging module will let you send emails outside the system by entering a remote email address into the users box. By default, the messages sent to external recipients via email address will not be logged in the Messages table. If you want these messages logged, you must add an additional field to your Messages table called "ToEmail" without the quotes and a data type of Email Address.

Below, we describe even more advanced ways to log emails sent externally.

<h2>Messaging about objects in your database</h2>

After you add the messages module, you may want to add two additional fields to the messages table that is created.

TableId = Pick From Table Settings
ItemId = Number without Decimals

If you link to the messages module and include a parameter to the tableid and itemid of an entity in your Qrimp App, the message will be created with the tableid and itemid specified. You can create the link like this:
messages.aspx?t=messages&compose=new&tableid=1000&itemid=1

In this case, the message will be logged as being sent in regards to the item with id of 1 in the table with id 1000.

<h2>Creating Contacts Automatically</h2>

If you'd like to send an email to someone outside your Qrimp App and simultaneously create a new contact in your Qrimp App for that recipient, you just need to add a Contacts table with the following fields:
Name - Single Line Text 100
Description - Multiline text 500 or greater
Email - Email Address

Then, whenever you send an email to a new email address, a contact for that person will be added to your database automatically. The Name and Email fields will both be set to the email address and the description will let you know the contact was created by sending a message from within the system.

<h2>Logging Contact Interactions</h2>

Like adding contact automatically, Qrimp can also log your interactions with those contacts through the internal messaging system. For this to work, your Qrimp App must have the Contacts table as described above plus an additional table called Interactions as described below. Be sure to create your table with the name "Interactions" without the quotes.

Fields Required on the Interactions Table:
Name - Single like Text 255 (Enough to accommodate the subject line)
ContactId - Pick From Contacts
InteractionDate - DateTime
Description - Multiline Text 5000+ (Enough to hold the message body)

You also click the check box for auditing so a createid and createdate field are added to the table.

Once you've built the contacts and interactions table, all messages you send from within your Qrimp App will be logged in these tables and you can write reports and integrate the messaging system into a larger CRM.


-->
Modules
deleteedit230Adding Modules[Modules] are sets of [database table]s that add functionality instantly.

To add a module go to Develop > Add Module

Your module is added instantly. You may see new menus across the top that allow you to access the new tables. Sometimes you will not, for example, the "Countries" module simply adds the countries table to your list of tables. You can then use this as a look-up table (see [Look-up Tables]) in your other tables.
Modules
deleteedit1311PayPal Order IPN ModuleHelp Topic coming soon.Modules
deleteedit132Page LayoutsPage Layouts tell Qrimp how to display data. Page layouts come in two varieties: Grid and Repeater

<h3>Grid</h3>
Grid templates are similar to a spreadsheet or HTML table layout and are generally useful to show a lot of data in tables. In this display type, the cell template field applies to each row/column combination.

<h3>Repeater</h3>
Most all other templates will be the repeater type. In this display type, each record in the table is considered a cell. You can include values from each field in the row by using [square brackets] notation.
Creating your own views
deleteedit177Copying a ViewThe easiest way to get started with creating a custom View is to copy an existing one and then modify it to suit your needs.
To copy a View, follow the following steps:

1.In the Menu, navigate to Design > Views

<img src="attachments/0bbdd80e-5990-44c6-98d5-04968c44cfb2/DesignViewCopy.jpg">

2.In the Page Templates grid, select the edit icon (<img src="/attachments/e88589d8-11ab-415a-96db-2f99d5a3d4d6/EditIcon.png">) next to the View that is similar to the one you want to create.

<img src="attachments/2defb493-d6b6-4856-a12b-ef2c4ecbf989/ViewPageTemplates.jpg">

3.Scroll down to the bottom of the page and click the Copy button: <img src="attachments/a19ee9e7-e360-4d13-a410-8e0167ff4d63/CopyButton.jpg">


4.Now click the edit button --<img src="attachments/2f4e8ee1-f590-4494-b445-6d65237db30b/EditButton.jpg"> -- and begin creating your new custom View.
Creating your own views
deleteedit207Convert a Field to a Drop-DownTo convert a field to a drop-down (also known as pick-from or look-up table), first go to the table with the field you want to convert and go to Table Management.

<img class="border" src="/attachments/3f1407ef-0b8c-4d3a-bace-966c351ad865/Lookup1.jpg">

Beside the column you wish to convert, click the "Convert to Pick From List" link.

<img class="border" src="/attachments/622bbe93-f4ad-4e7d-b1ab-69b239a2fb7b/Lookup2.png">

You will get a warning pop-up asking you to confirm the change. Click okay. Once you have converted the field, you will notice a magnifying glass in your table management list and a link to the look-up table.

<img class="border" src="/attachments/f60ca418-8cdd-4f9b-8db2-4f5e4ea68c74/Lookup3.png">

As always when adding a new column, use the [form designer] to position the new field in your [Detail View]/[Edit View]/Add New View.
Creating a Look-up Table
deleteedit254Add a Drop-Down FieldFirst, make sure you have an appropriate table to use as a lookup table (see [Look-up Tables].)

Go to the table you want to add a drop down to, then go to [Table Management]. Click "Add a column"

In the "datatype" drop-down, select the database table you wish to add as a lookup table.

You may also wish to [Convert a Field to a Drop-Down].
Creating a Look-up Table
deleteedit264Hide Inactive Fields from Drop-DownsScenario: Bob is creating a new timesheet, and he's selecting a client from a drop-down. If some of your clients are no longer active, you do not want him to see them in this drop-down.

In this case, the first thing you will have to do is make sure your system has a way of knowing the client is no longer active. If you do not already have a field that tells you whether a client is active, you must [Add an Active/Inactive Field].

Then you will have to set the clients table to only show active clients when users are entering clients records from a drop-down field in another table.

<h2>Get the Table ID of the Clients Table</h2>
<a href="db.aspx?t=HelpTopics&id=1293&vid=11">Find the id of your Table</a> and write it down, copy it to your clipboard, or remember it. You will need to get the right table id number for this to work!

<img class="border" src="attachments/developer.qrimp.com-bdbc81bf-d9fd-42ec-a709-8404428a4f06/clientstableid.png" />
<span class="small">You can find the TableID from Table Management</span>

<h2>Write a SQL query</h2>
To hide an inactive record, you will need to use [SQL] security. Go to your Clients Table. Go to Table Management or Manage Tables. Click the link that says "Configure Table Settings" or "Settings".

Scroll down the Table Settings page to the field called "sqlsecurity". In that textbox, write the following statement, including all punctuation*:

<noeval>('1006'=1048 or Active = 'Y')</noeval>

<strong>Important: Change the id to match the id of your table!</strong>

<img class="border" src="attachments/developer.qrimp.com-ad7e285d-a7ed-4ec2-b5ed-33012a6d5aac/activeequalsy.PNG" />

Now, when Bob is creating a timesheet, he only sees active clients!

<img class="border" src="attachments/developer.qrimp.com-fd9d129a-a606-4b41-bfd4-0f58350af712/filteredclientlist.png" />

<h2>Important: Complete Data Entry is Key!</h2>
If you don't mark each client record as either active or inactive (and the field is empty) the record will be treated the same as if it were inactive. Be sure to mark all clients that you want in the list active!

* You could also write Active <> 'N'. The <> in a sql statement means 'not equal to'.
Creating a Look-up Table
deleteedit126Action IconsThese icons generally appear in the [Content Header], which is displayed at the top of your table below the [Menus].

<img src="attachments/16a4647b-af66-4cc7-8048-a4602798d624/ActionIcons.png">

<h2>Default Icons</h2>
When you build a new table in your Qrimp application, icons are created automatically based on the functionality that is possible within that table and according to the [User Groups] permissions. You can add or delete icons if you need more or less functionality. You can even create new actions by writing your own [operations] then choosing icons from the /icons/crystal_project/32x32 and putting them in the [Headers and Footers].

<h2>Editing Actions</h2>
Go to the table and view you want to change the actions for. Then go to Develop > Header/Footer. You will see the HTML for the icons. If nothing is listed, you will need to edit the default header / footer for your table, which is part of the [table definition].

The following are some default icons you will see in your Qrimp app.

<h2>Views Icons</h2>
These icons allow you to change the way you are viewing the data. To learn more, read about [Views].
<img src="/attachments/d8b7ffcf-fc7d-4ec9-ae46-a5428e455455/CalendarIcon.png"> [Calendar View]
<img align=absmiddle src="icons/crystal_project/32x32/actions/view_tree.png" alt="Tree View"/> [Tree View]
<img align=absmiddle src="icons/crystal_project/32x32/actions/view_text.png" alt="Grid View"/> [Grid View]
<img align=absmiddle src="/icons/crystal_project/32x32/mimetypes/spreadsheet_document.png" alt="Reports"/> [Reports]
<img align=absmiddle src=/icons/crystal_project/32x32/actions/next.png alt="Next Item"> Next Item - see [NextPrevious]
<img align=absmiddle src=/icons/crystal_project/32x32/actions/previous.png alt="Previous Item"> Previous Item - see [NextPrevious]

<h2>Data Editing Icons</h2>
Add records, edit or copy existing records, search and delete your data and more.
<img align=absmiddle src="icons/crystal_project/32x32/actions/edit_add.png" alt="Add New"/> Create View
<img align=absmiddle src="icons/crystal_project/32x32/actions/filefind.png" alt="Search"/> [Search]
<img align=absmiddle src="icons/crystal_project/32x32/apps/kmenuedit.png" alt="Edit Table Display"/> View [Headers and Footers]
<img align=absmiddle src="/icons/crystal_project/32x32/mimetypes/kivio_flw.png" alt="Design"/> [Design View]
<img align=absmiddle src="/icons/crystal_project/32x32/actions/cancel.png" alt="delete"> [Delete]
<img align=absmiddle src="/icons/crystal_project/32x32/actions/undo.png" alt="Cancel"> [Cancel]
<img align=absmiddle src="/icons/crystal_project/32x32/mimetypes/file_temporary.png"> [Versioning]

<h2>Advanced: Hiding Icon Labels in the [Content Header]</h2>
If you do not want to see the word that corresponds to the icon below the icon, you can change the stylesheet to #contentheader.label{display:none} or you can write a sql statement to remove them from all or selected tables. See [Stylesheets], [CSS] and [Using SQL Statements].
Content Header
deleteedit134NextPreviousThe next/previous arrow icons in the [Edit View] and [Detail View] of a record let you page through the items without changing your view.

<table><tr><td><a href="db.aspx?t=HelpTopics&id=1343&vid=11" title="Previous Help Topic"><img align=absmiddle class="noborder" src=/icons/crystal_project/32x32/actions/previous.png alt="Previous Help Topic"></a></td><td><a href="db.aspx?t=HelpTopics&id=3&vid=11" title="Next Help Topic"><img class="noborder" align=absmiddle src=/icons/crystal_project/32x32/actions/next.png alt="Next Help Topic"></a></td><tr><td> <a class="small" href="db.aspx?t=HelpTopics&id=1343&vid=11" title="Previous Help Topic">Previous</a></td><td><a class="small" href="db.aspx?t=HelpTopics&id=3&vid=11" title="Next Help Topic">Next</a></td></tr></table>
<span class="small">The next previous icons</span>

To add the next/previous icons to the top of your records go to the table you want to add them in, then go to Develop > Header/Footer.

Copy and paste the following [HTML] with [square brackets] into the Header field of your [Content Header]

<textarea><noeval><td><a href="db.aspx?t=HelpTopics&id=1343&vid=11" title="Previous Record"><img align=absmiddle class="noborder" src=/icons/crystal_project/32x32/actions/previous.png alt="Previous Record"></a></td><td><a href="db.aspx?t=HelpTopics&id=3&vid=11" title="Next Record"><img class="noborder" align=absmiddle src=/icons/crystal_project/32x32/actions/next.png alt="Next Record"></a></td><tr><td> <a class="small" href="db.aspx?t=HelpTopics&id=1343&vid=11" title="Previous Record">Previous</a></td><td><a class="small" href="db.aspx?t=HelpTopics&id=3&vid=11" title="Next Record">Next</a></td></noeval></textarea>

Note: HTML formatting must be not have line breaks.
<img alt="NextPrevious url code" src="/attachments/b4aa565f-0119-4030-8490-912e669e8ebc/Picture%206.png">
Content Header
deleteedit116Menu Tabs Hide Action IconsIf you have too many tables and/or a narrow browser window, you may find that your menu tabs overlap the [Content header] area of your site, obstruction your view of the [Action Icons].

To resolve this issue, you can sometimes press Ctrl and the minus key (Ctrl-) to reduce the text size on the tabs and move them up.

We are working to resolve this issue.
Known Issues
deleteedit135Too much white space around elementsIf you edit text or [HTML] in [Headers and Footers] and [Field Templates] and other [System Tables], remove the spaces between your HTML tags before saving.

The description field of system tables automatically inserts a hard line break when you are entering text, so if you leave spaces between your HTML tags, you will notice extra spaces appearing once you have saved the item.
Known Issues
deleteedit1338Sorting in Grid EditYou cannot sort by the 'id' or 'name' column in [Grid Edit].Known Issues
deleteedit1320Site SearchTo search your entire site (all tables in your Qrimp app), use the search field at the top right of your app.

<img class="border" src="attachments/developer.qrimp.com-6d5f06b4-168a-4841-962d-9e9d81031799/sitesearch.png" />

You will see a list of any tables that contain the word or number you searched for.

Click the link to go to that table or record.

Search
deleteedit1321Date SearchTo search by date, look near the top right of your app. You will see a calendar icon. Click on the icon.

<img class="border" src="attachments/developer.qrimp.com-69e9ac70-5df6-44b1-8b2f-6f0b1996c8f9/datesearch.png" />

Click a date then click search.
<img class="border" src="attachments/developer.qrimp.com-075663bf-d8f2-4ff2-b862-ea8cc7d55dbc/dateinsearchfield.png" />

Your search results appear. They are linked to the database records, so click them to go to the record.
<img class="border" src="attachments/developer.qrimp.com-237ff48f-f87e-4ddc-9ec7-83738ee50b39/datesearchresults.png" />
Search
deleteedit1322Table SearchTo search a table, click on the search icon <img class="noborder" align="absmiddle" src="/icons/crystal_project/32x32/actions/filefind.png"> in the [Content Header].

<img class="border" src="attachments/developer.qrimp.com-9abb3da6-dba7-45dc-b14e-bf8797606785/tablesearch.png" />

You will see a dialog box that will allow you to enter criteria for your search:

<img class="border" src="/attachments/12e532dc-8bc0-46c0-b26b-11494d7d4bbb/searchdialogbox.png">

Choose a search filter from the drop-down list of operators (contains, greater than, equals, etc.) to limit the results of your search. For example, if we only wanted to find modules that contained the word "tasks" in the description field, our search would look like this:

<img class="border" src="/attachments/fca0436d-1a11-4662-8b1a-9e6a22b370a5/searchfilter.png" />
Search
deleteedit166Automating SynchronizerIf you would like to automate the synchronization process to create a [redundant fail over system] for [disaster recovery], you will want to automate your Synchronizer on an hourly or daily interval.

Automating Synchronizer will allow you to create two systems that are identical up to the last synchronize -- including data and file attachments.

Because the synchronize process takes a bit of time itself, remote copies of applications are not identical and should not be considered identical. Using Synchronizer in this way is fine for remote sites that are all copies of a master. In this way, your system can be set up as a [Content Delivery Network] to serve users in remote locations on Qrimp nodes closer to them. You can also [Automate Qrimp Publisher] in this way to push static copies of your site to remote servers around the globe.

Imagine a scenario where your data management happens inside a firewall and you publish content to a CDN outside your firewall. You could first deploy your application from inside the firewall to a secure node in the cloud. Remote nodes around the world could be set to automatically synchronize from that remote node, then publish their contents using templates customized to the locale of the visitors hitting those nodes.

If you would like to configure Qrimp to deliver your information in this way, please contact [Qrimp Support].
Synchronizer
deleteedit64Rename TableTo rename a table, navigate to your table, then go to Develop > Manage Tables > Find your Table in the list.

Below the name field, there is a link "rename table". Click on it. Choose a new name for your table and click save.

<span class="error">Caution: Default sub-menus will be renamed to the name of the new table</span>

Rarely, but sometimes, renaming tables can be problematic if you have other tables or data in your application that refers to the table you want to rename.
Table Settings
deleteedit193Default TemplateWhen you build a database, data can be displayed in different ways. For example, sometimes the data appears in a select box, a table or grid view, and if it is a record related to another one, sometimes it appears on the right hand side when viewing a main record.

Let's say we have a table called Transactions that has many Payments associated with it. When creating a Payment, a select box will appear prompting the user to select a Transaction to associate with the new payment. If, after creating the payment, the transaction selected in the drop down box is viewed, the right hand rail will show a list of Payments associated with the Transaction record.

In this case, Qrimp will try to be smart about how it shows those records in the right hand rail so you can understand exactly which payments those are. Because screen space in the browser is limited, Qrimp chooses just a single piece of information to display. It does this in a particular order:

<ol>
<li>If a field exists in the table called "Name" that data is shown.
<li>If no Name field exists, Qrimp finds the first text field with 100 or fewer characters to represent the record.
<li>If no no text fields with less than 100 characters is found, Qrimp shows the ID for the record.
</ol>

Sometimes this strategy is suboptimal, meaning, you want to "help" Qrimp understand how to present the data to your application's users. To help Qrimp, each table in your database has [Table Settings] which you can use to describe how Qrimp should display the data in it.

There are two fields on the Table Settings page that you can use to tell Qrimp how to display the data, the first is the [default field] which appears near the top of Table Settings Edit screen. If you want Qrimp to display data from only one field in your table in the right hand rail or in select boxes, choose a column in the Default Field drop down.

The Second field is the Default Template, which can be seen near the bottom of the page. If you want to create a template for records in the table that contains information for several columns, use the Default Template.

Continuing from the example above, let's have a Payments table with just the ID, Amount, PaymentDate, and PaymentMethod. The PaymentMethod is a pickfrom the PaymentMethods table. In this table, there is no text field to represent the payments, so we want to create a Default Template using the Payment Amount and the Payment Method. Since the Payment Method is a pick from, we need to use Square Brackets to represent this.

To accomplish our goals, we will create a Default Template as follows:
<noeval><pre>
$[Amount] - [PaymentMethods:[PaymentMethod]]
</pre></noeval>

This use of Square Brackets tells Qrimp, that when displaying a Payment, format the data using a dollar sign, then the Amount of the payment, followed by the name of the payment method used, which is retrieved from the PaymentMethods table using the value in the PaymentMethod field of the particular Payment record.

Table Settings
deleteedit1342Default FieldsA default field is the field from any table that is displayed in a related table or on the calendar view.

<img class="border" width="550" src="http://developer.qrimp.com/attachments/developer.qrimp.com-b6d0bb35-3e7a-4294-9174-523e20fd428a/defaultfieldinrelateddata.png" />

If no default field is selected, Qrimp will use the first text field in your table as the default field. If there is no text field, Qrimp will use whichever field comes first.

<h2>Changing the Default Field</h2>
To change the default field, go to your table, then click the Table Management sub-menu.

At the top of the table management page, click the link that says "Configure Table Settings".

In the defaultfield drop-down, select the name of the field you want to appear.
<img class="border" src="http://developer.qrimp.com/attachments/developer.qrimp.com-4470af98-dea4-4014-994e-61ddb6092df5/changedefaultfieldtodescription.png" />

In this example, we will change the field from being the name of the timesheet to the description.


Table Settings
go to page: 1 2 3 4 5 6 7 8 9 10 243 records. Showing